Cinnamon Rolls Recipe: Easy Homemade Sweet Treat
Introduction
Imagine waking up to the smell of fresh cinnamon rolls baking in the oven—it’s one of the most wonderful smells in the world! This cinnamon rolls recipe will teach you how to make the most delicious sweet rolls you’ve ever tasted.
What Makes Cinnamon Rolls So Special?
These comforting cinnamon rolls represent love, warmth, and special family moments. For generations, mothers and grandmothers would make cinnamon rolls on Saturday evenings, letting the dough rise overnight so fresh rolls could be baked Sunday morning. The whole house would fill with the amazing smell of cinnamon and sugar, waking everyone up in the best possible way! These homemade cinnamon rolls with glaze became a weekend tradition in many homes because they made ordinary mornings feel like celebrations. Rolling out the dough, spreading the cinnamon filling, and watching the rolls rise was an act of love—these treats took time and care, which made them even more special.
Recipe Quick Stats
Cinnamon Rolls: At-a-Glance
Ingredients You’ll Need
For the Soft Dough:
- 1 cup warm milk (110°F—feels warm but not hot on your wrist)
- 2 eggs, room temperature
- ⅓ cup butter, melted
- 4½ cups all-purpose flour
- 1 teaspoon salt
- ½ cup white sugar
- 2½ teaspoons active dry yeast
For the Sweet Filling:
- 1 cup brown sugar, packed
- 2½ tablespoons ground cinnamon
- ⅓ cup butter, softened
For the Cream Cheese Frosting:
- 3 ounces cream cheese, softened
- ¼ cup butter, softened
- 1½ cups confectioners’ sugar (powdered sugar)
- ½ teaspoon vanilla extract
- ⅛ teaspoon salt
How to Make Cinnamon Rolls Recipe
This simple cinnamon rolls for beginners guide breaks down every step clearly!
Making the Dough
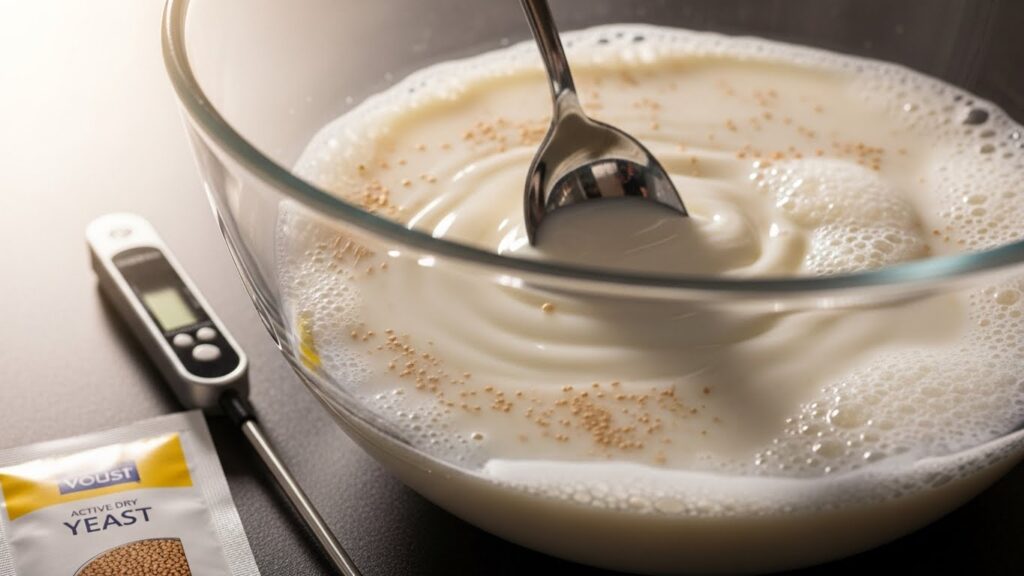
Step 1: Wake Up the Yeast
Pour the warm milk into a large bowl. Add the sugar and yeast, then stir gently. Let this mixture sit for 5-10 minutes until it gets foamy on top, like a bubble bath! This foam means the yeast is “waking up” and ready to make your dough rise. If it doesn’t foam, your milk might have been too hot (which kills yeast) or too cold (which won’t wake it up)—try again with fresh yeast and milk at the right temperature.
Step 2: Mix the Wet Ingredients
Add the eggs and melted butter to your foamy yeast mixture. Stir everything together with a wooden spoon. Then add the salt and 2 cups of the flour. Beat everything together until it’s smooth and well mixed. The mixture will look like thick pancake batter at this point.

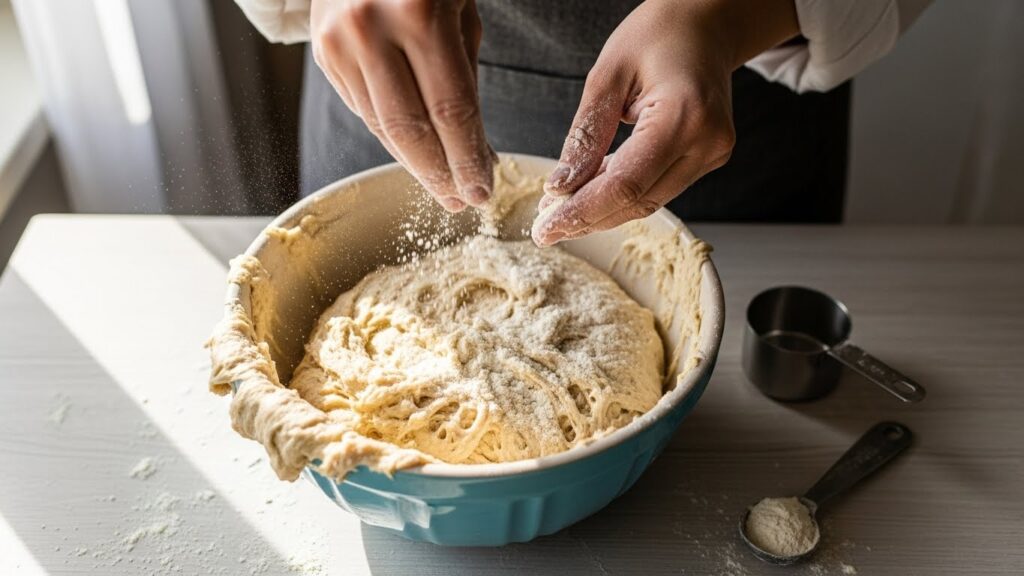
Step 3: Add More Flour
Now start adding the rest of the flour, about half a cup at a time. Stir after each addition. When the dough starts getting too thick to stir with a spoon, it’s time to use your hands! The dough should pull away from the sides of the bowl but still feel slightly sticky.
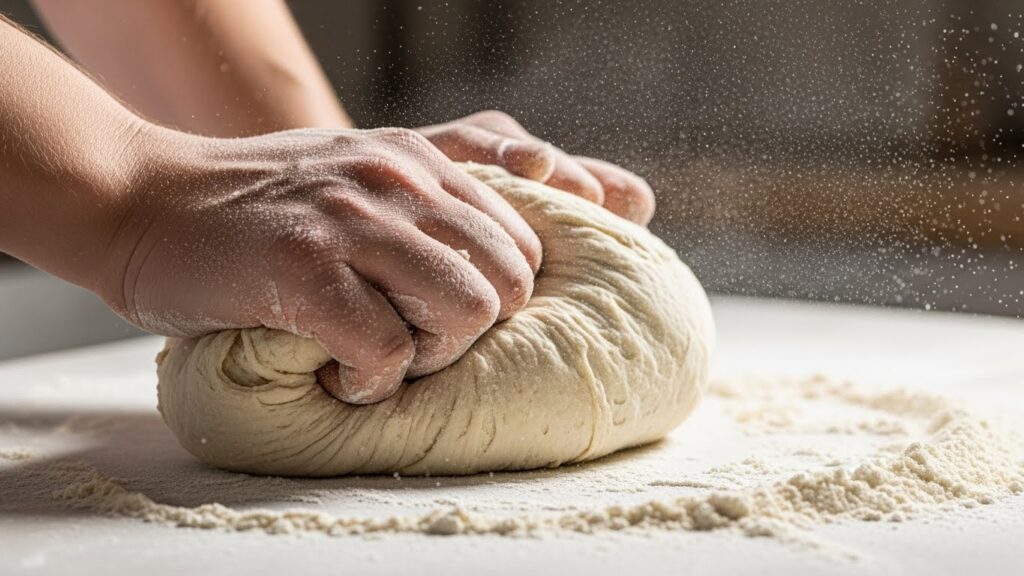
Step 4: Knead the Dough
Sprinkle some flour on your counter or a large cutting board. Put your dough on the floured surface and start kneading! To knead, push the dough away from you with the heels of your hands, fold it back over itself, turn it a quarter turn, and repeat. Keep doing this for 5-8 minutes. The dough will change from sticky and rough to smooth and elastic—like a soft, stretchy pillow! This kneading is what makes your rolls soft and fluffy.
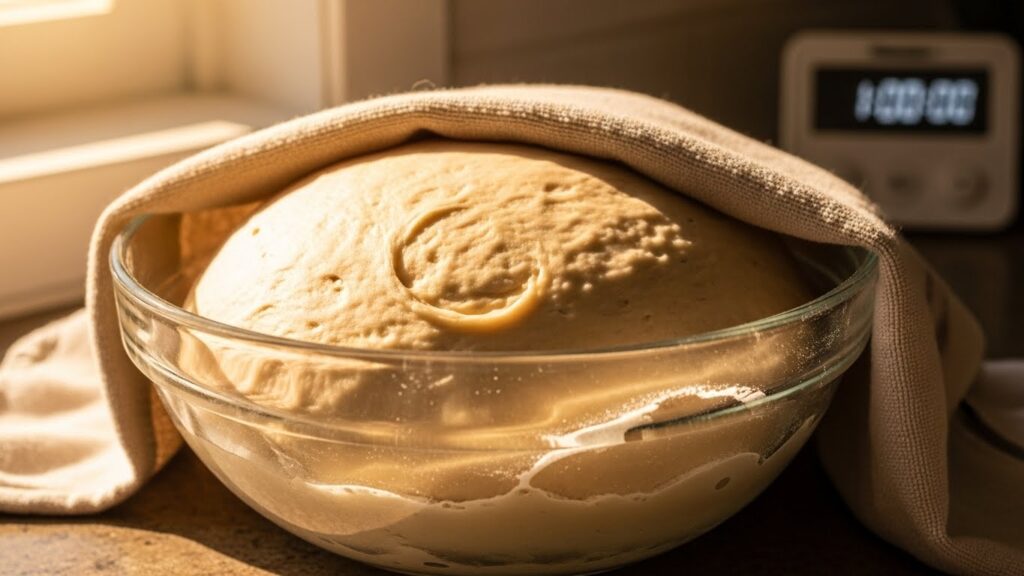
Step 5: Let It Rise
Rub a little butter or oil inside a large bowl. Put your dough ball in the bowl and turn it over so all sides are lightly greased. Cover the bowl with a clean kitchen towel or plastic wrap. Put it somewhere warm (like on top of your refrigerator or in a sunny spot) and let it rest for about 1 hour. The dough should double in size—it will look like it’s been inflated like a balloon!
Creating the Cinnamon Filling
Step 6: Roll Out the Dough
After the dough has risen, punch it down gently with your fist (this is the fun part!). Put it on a floured counter and use a rolling pin to roll it into a big rectangle, about 16 inches by 21 inches. Try to keep the edges fairly straight and the thickness even—about ¼ inch thick all over.

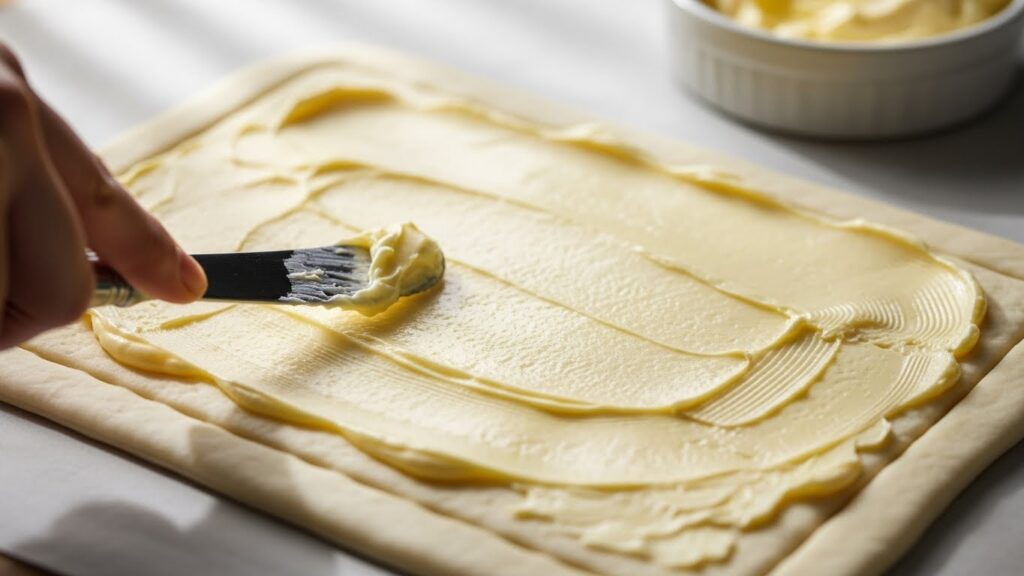
Step 7: Spread the Butter
Take your softened butter (it should be soft like room-temperature peanut butter, not melted) and spread it all over the dough rectangle using a butter knife or the back of a spoon. Leave about half an inch at the edges without butter.
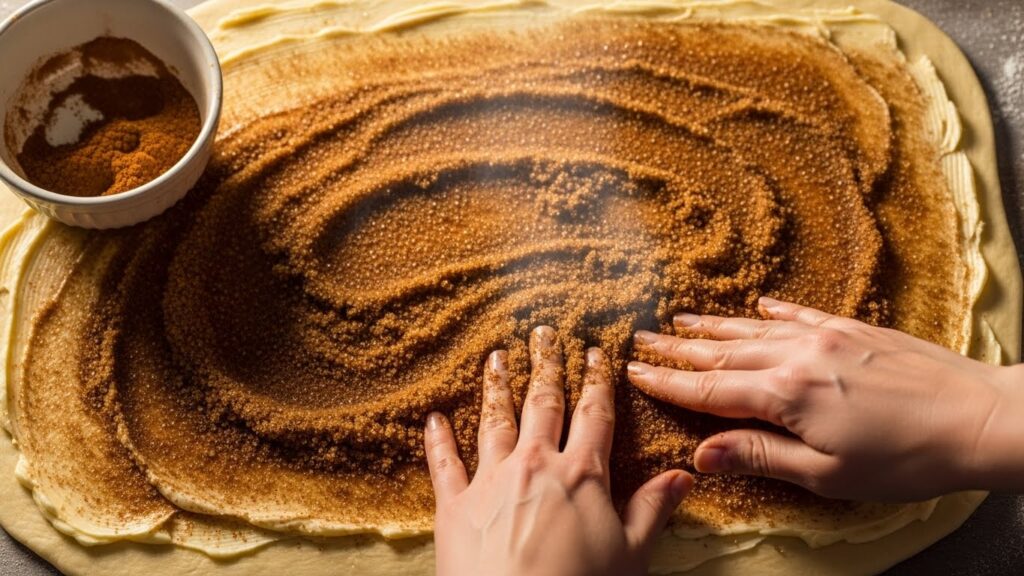
Step 8: Add the Cinnamon Sugar
In a small bowl, mix together the brown sugar and cinnamon until well combined. Sprinkle this mixture evenly over the buttered dough. Use your hands to spread it around so every part is covered. The cinnamon and sugar will smell amazing!
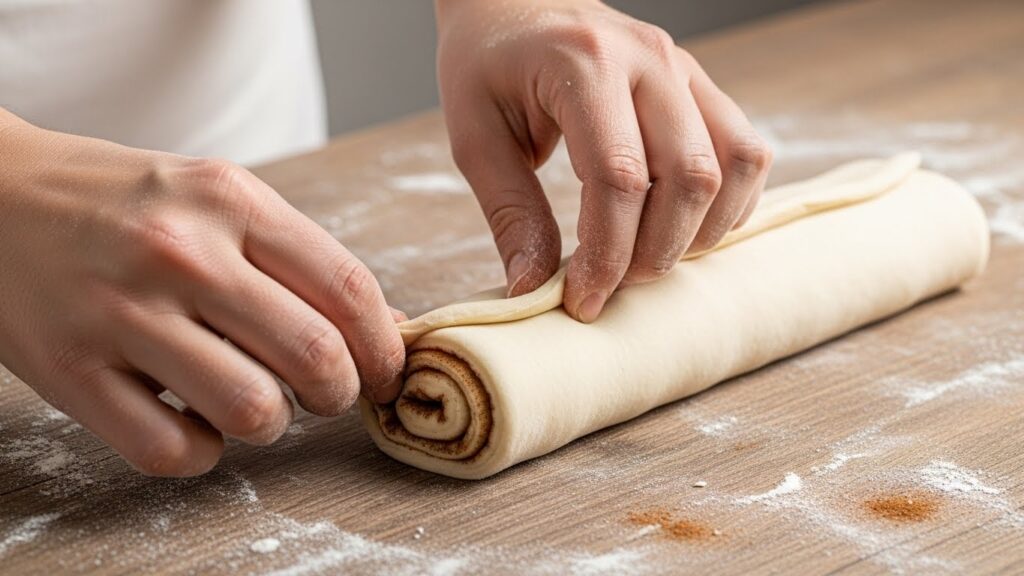
Step 9: Roll It Up
Starting from one of the long sides, carefully roll the dough up tightly like you’re rolling up a sleeping bag or a yoga mat. Keep the roll even and tight as you go. When you get to the end, pinch the edge into the roll to seal it.
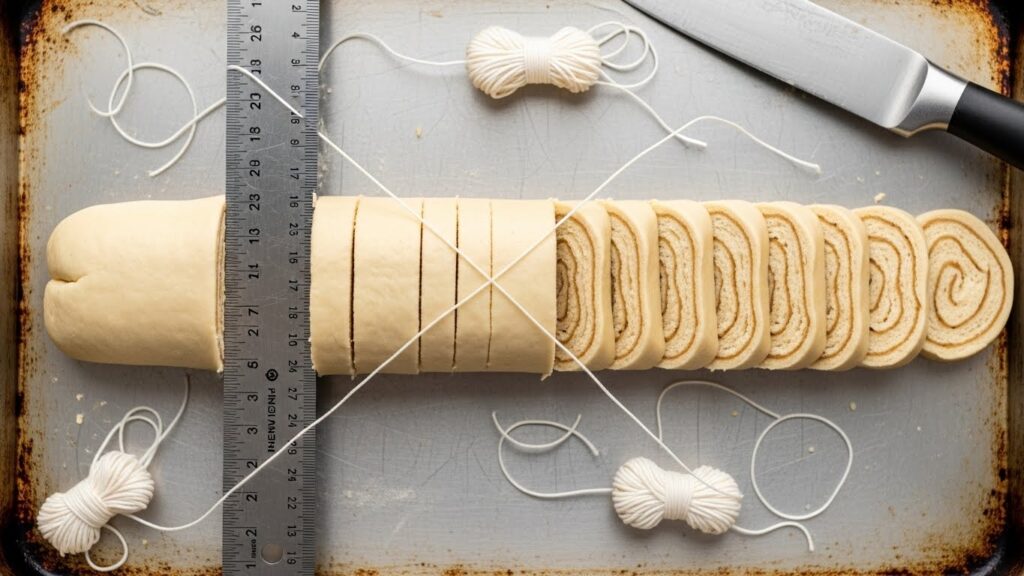
Step 10: Cut the Rolls
Using a sharp knife or dental floss (really!), cut the log into 12 equal pieces. If you use dental floss, slide it under the roll, bring the ends up and cross them, then pull—it cuts perfectly without squishing! Place the rolls cut-side up in a greased 9×13 inch baking pan. They should almost touch each other.
The Second Rise and Baking
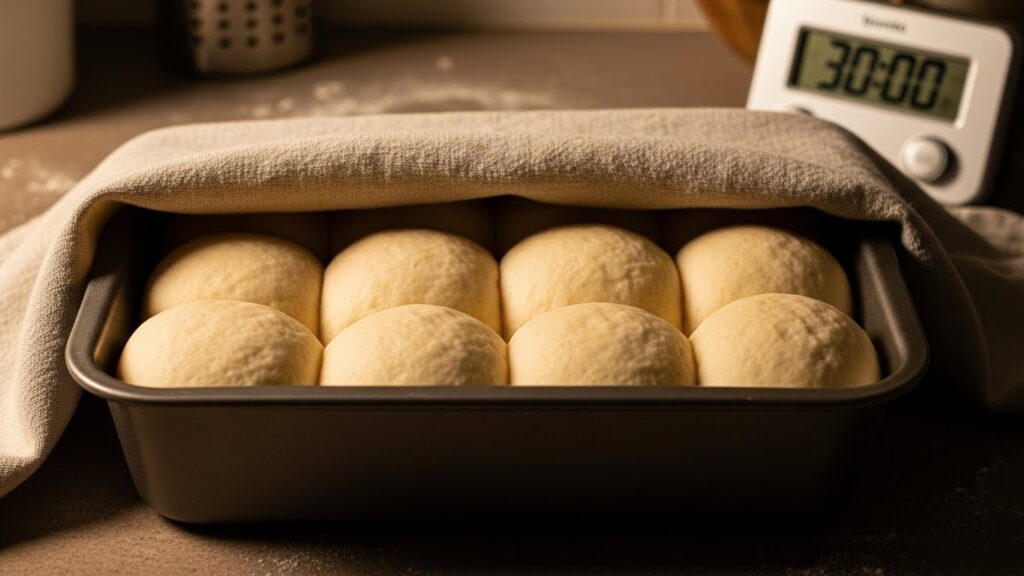
Step 11: Let Them Rise Again
Cover your pan of rolls with a towel and let them rise again for about 30 minutes. They should look puffy and nearly doubled. This second rise makes them extra soft and fluffy!
Step 12: Bake to Golden Perfection
While the rolls are rising, preheat your oven to 350°F. When the rolls are puffy and the oven is hot, put the pan in the oven and bake for 20-25 minutes. The rolls should be golden brown on top and smell incredible. Don’t overbake them or they’ll be dry instead of soft!

Making the Cream Cheese Frosting
Step 13: Mix the Frosting
While the rolls are baking, make your frosting. In a medium bowl, beat together the softened cream cheese and butter with a mixer or wooden spoon until smooth and creamy. Add the powdered sugar, vanilla, and salt. Beat until the frosting is fluffy and smooth with no lumps. If it seems too thick, add a tiny bit of milk.

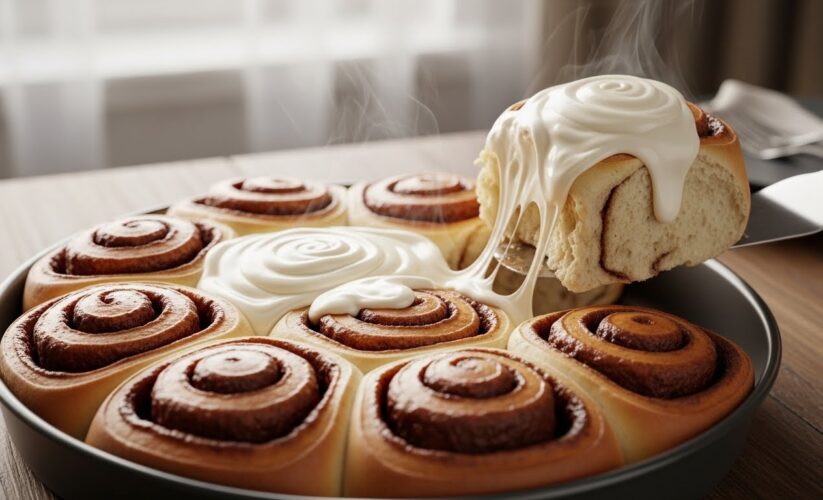
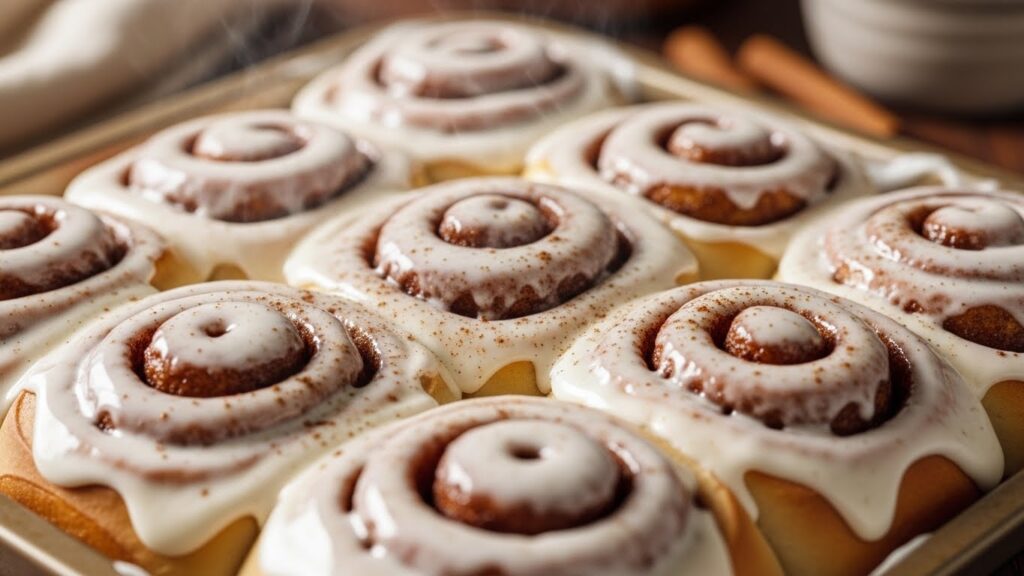
Step 14: Frost and Serve
When the rolls come out of the oven, let them cool for just 2-3 minutes—you want to frost them while they’re still warm! Spread the frosting generously over all the rolls. The frosting will melt slightly into the warm rolls, making them even more delicious. These cinnamon rolls with cream cheese icing are now ready to enjoy!
Pro Tips for the Best Cinnamon Rolls Ever
1: To make these quick cinnamon rolls for tomorrow morning, prepare them the night before! After cutting and placing the rolls in the pan (step 10), cover them tightly with plastic wrap and put them in the refrigerator overnight. In the morning, take them out and let them sit at room temperature for 30 minutes, then bake as directed. Wake up to fresh rolls without all the morning work!
2: Make sure all your dairy ingredients (milk, eggs, butter, cream cheese) are at room temperature before you start. This helps the dough come together better and makes the frosting smoother and easier to spread.
3: Don’t skimp on the kneading! Those 5-8 minutes of kneading develop the gluten in the flour, which is what makes the rolls soft and fluffy instead of dense and tough. Your arms might get a little tired, but it’s so worth it!
Classic Cinnamon Rolls From Scratch
These classic cinnamon rolls from scratch are made the traditional way—with yeast dough that rises slowly, creating amazing texture and flavor. Unlike quick recipes that use baking powder, yeast-based rolls are lighter, fluffier, and have that special taste that you can’t get any other way. This is how grandmothers made them, and how bakeries still make them today. Yes, it takes a little time, but most of that time is just waiting for the dough to rise—you’re not actually working the whole time!
Soft and Fluffy Cinnamon Rolls Secret
The secret to soft and fluffy cinnamon rolls is in three things: kneading the dough properly, letting it rise twice (once as a ball, once after shaping), and not overbaking. The kneading develops the structure, the rising creates air pockets that make them light, and taking them out of the oven at just the right moment keeps them moist and tender. These three steps work together like magic!
Old Fashioned Cinnamon Rolls Tradition
These old fashioned cinnamon rolls were a special weekend tradition in many homes. Saturday night, the mother or grandmother would mix up the dough and let it rise. Sunday morning before church, she’d roll out the dough, spread the filling, cut the rolls, and let them rise again while everyone got dressed. The rolls would go into the oven just before the family left for church, and when they came home, the house would smell absolutely heavenly! Sometimes she’d prepare them Saturday night and bake them Sunday morning, creating the same wonderful experience.
Sweet Cinnamon Rolls for Every Occasion
These sweet cinnamon rolls aren’t just for Sunday breakfast! Make them for Christmas morning, birthday breakfasts, Mother’s Day brunch, or any time you want to make someone feel special. They’re perfect for sleepover breakfasts, holiday gatherings, or just because you want to treat your family. The effort you put into making these shows people you care, and that makes them taste even sweeter!
Cinnamon Rolls Breakfast Recipe Perfect Start
This cinnamon rolls breakfast recipe creates the perfect morning! Serve these warm rolls with scrambled eggs, crispy bacon, and fresh fruit for a complete breakfast that will make everyone happy. Or keep it simple and let the rolls be the star—they’re so good they don’t need anything else! Pour a glass of cold milk or a cup of hot coffee, and you have breakfast perfection.
Homemade Cinnamon Rolls With Glaze Alternative
While this recipe uses cream cheese frosting, you can also make homemade cinnamon rolls with glaze instead! For a simple glaze, mix 1 cup of powdered sugar with 2-3 tablespoons of milk and ½ teaspoon of vanilla. Stir until smooth, then drizzle over warm rolls. The glaze is a bit lighter and sweeter than cream cheese frosting—both are delicious, so try each and see which your family likes best!
Comforting Cinnamon Rolls Magic
There’s something almost magical about comforting cinnamon rolls. The smell alone makes people feel happy and loved. When you make these for your family, you’re not just making food—you’re creating memories. Years from now, your children will remember the mornings when they woke up to the smell of cinnamon rolls baking, and they’ll make them for their own families. This is how traditions continue, and how love is passed down through generations.
Serving Suggestions
Enjoy these delicious cinnamon rolls:
- Warm from the oven for breakfast
- With hot coffee or cold milk
- Alongside scrambled eggs and bacon
- With fresh fruit salad
- As a dessert with vanilla ice cream
- For holiday brunches and special occasions
- With hot apple cider in fall
- As an after-school treat
Storage and Leftover Advice
Let any leftover rolls cool completely, then store them covered at room temperature for 2-3 days. The cream cheese frosting is fine at room temperature for this short time. To reheat, microwave individual rolls for 15-20 seconds until warm—they’ll taste fresh again!
For longer storage, you can freeze unfrosted rolls for up to 3 months. Wrap them tightly in plastic wrap, then aluminum foil. Thaw at room temperature, warm in a 300°F oven for 5-10 minutes, then add fresh frosting. You can also freeze frosted rolls, but the frosting texture might change slightly when thawed.
Frequently Asked Questions (FAQs)
1. Can I use instant yeast instead of active dry yeast?
Yes! Use the same amount of instant yeast, but you can skip the step of dissolving it in warm milk. Just mix the instant yeast right in with the flour, then add the warm milk and other wet ingredients.
2. My dough isn’t rising. What went wrong?
Usually this means the yeast died (milk was too hot) or didn’t activate (milk was too cold, or yeast was old). Make sure your milk is warm but not hot—it should feel comfortable on your wrist. Also check your yeast’s expiration date!
3. Can I make the dough in a stand mixer?
Absolutely! Use the dough hook attachment and mix on low speed for about 6-8 minutes instead of kneading by hand. The dough should pull away from the sides of the bowl and be smooth and elastic.
4. Can I add raisins or nuts?
Yes! Sprinkle ½ cup of raisins and/or chopped pecans or walnuts over the cinnamon sugar before rolling up the dough. This adds extra flavor and texture.
5. How do I know when the rolls are done baking?
They should be golden brown on top and sound slightly hollow when you tap them. The internal temperature should be about 190°F if you have a food thermometer. Don’t overbake—slightly underdone is better than overdone for soft rolls!
A Note from Author
This cinnamon rolls recipe represents one of the sweetest traditions in American home baking. Making yeast dough from scratch might seem old-fashioned in today’s world of instant everything, but there’s something incredibly special about taking the time to create these rolls with your own hands.
The tradition of Saturday-night baking and Sunday-morning eating created a rhythm in family life that brought everyone together. Children would watch mothers and grandmothers work with the dough, learning not just the recipe but also patience, timing, and care. The house filled with warmth—both from the oven and from the love that went into the baking.
In many families, the smell of cinnamon rolls meant celebration. It meant someone cared enough to spend time creating something special. It meant the morning was going to be wonderful, unhurried, and filled with sweetness in every sense of the word. At NostalgicEats.com, we believe these traditions matter. In our fast-paced world, taking time to make cinnamon rolls from scratch is an act of love—for your family, for tradition, and for yourself.
Conclusion
This easy cinnamon rolls recipe proves that homemade cinnamon rolls are achievable and delicious! Whether you make classic cinnamon rolls from scratch for Sunday breakfast or prepare soft and fluffy cinnamon rolls for the holidays, this simple cinnamon rolls for beginners guide makes it easy. Try this quick cinnamon rolls recipe using the make-ahead method, enjoy the best cinnamon rolls ever fresh from your oven, or stick to old fashioned cinnamon rolls traditions. These cinnamon rolls with cream cheese icing are perfect sweet cinnamon rolls, an amazing cinnamon rolls breakfast recipe, and delicious homemade cinnamon rolls with glaze if you prefer. Every bite of these comforting cinnamon rolls delivers pure happiness!
Ready to fill your home with the most wonderful smell in the world? Make this cinnamon rolls recipe and create sweet memories that will last a lifetime! Visit NostalgicEats.com for more classic recipes that bring families together!