Cinnamon Rolls Recipe: Easy Homemade Sweet Treat
Grandma’s Soft Homemade Cinnamon Rolls Recipe From Scratch With Cream Cheese Frosting — The Saturday Morning Ritual Nobody Wanted to End
Saturday mornings at grandma’s house smelled like yeast and cinnamon before anyone was fully awake.
You’d hear the oven click on around 6 a.m. — that soft mechanical sound that somehow traveled all the way down the hallway to wherever you were sleeping. By 6:30, the smell had followed. By 7, it was impossible to stay in bed. You’d pad into the kitchen in socks and find her already there, flour dusted up to her elbows, a pan of rolls rising under a clean dish towel on the radiator.
She’d hear you coming and say, without turning around: “Go set the table.”
Not Sure What to Cook Today?
Open your fridge, pick a few ingredients… and turn them into a real recipe in seconds.
No guessing. No waste. Just simple, nostalgic meals.Grandma’s soft homemade cinnamon rolls recipe from scratch with cream cheese frosting is the recipe this whole blog was built to preserve. Not just the measurements — those came later, after years of testing. But the philosophy behind it: that the best things take time, that dough knows when it’s rushed, and that Saturday mornings are worth getting up early for.
Welcome to Nostalgic Eats, where the recipes worth keeping are the ones that pull you out of bed before anyone else is awake.
The Warm Radiator, the Dish Towel, and the Thing She Never Rushed
There is a version of this story that could begin with chemistry — with yeast activation temperatures and gluten networks and the Maillard reaction on a warm, sugared crust. And we’ll get to that, because understanding the science helps you bake better rolls.
But the story begins with a dish towel.
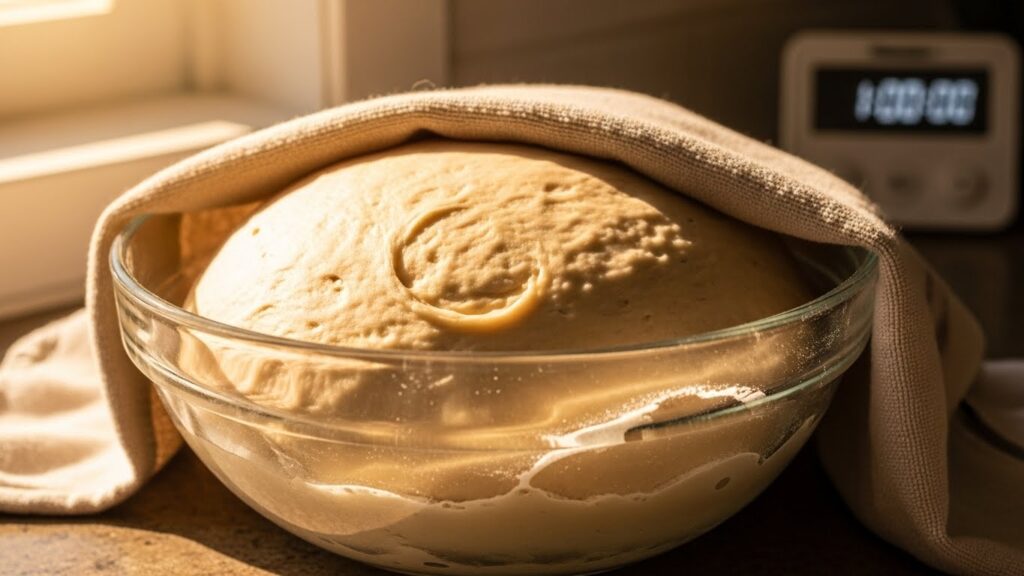
Grandma always proofed her rolls on the radiator in the back kitchen, covered with the same faded blue dish towel she’d had since before any of us could remember. She didn’t use an oven for proofing. She didn’t use a warm water bath. She used the radiator, and the rolls rose slowly, gently, in ambient warmth — over an hour, sometimes longer.
The slow rise, as it turns out, is the whole point.
King Arthur Baking explains the science grandma operated on by instinct: a slow, cool rise develops more complex flavor compounds in the dough than a fast, hot rise does. Yeast produces not just carbon dioxide during fermentation — it produces acids, alcohols, and aromatic esters that create depth. A roll that rose slowly for 90 minutes tastes fundamentally richer than one that was rushed in 30.
She never knew the words for any of that. She just knew the rolls tasted better when she didn’t hurry them.
💡 Grandma’s Rule: “Dough doesn’t like to be watched. Cover it, walk away, and come back when the house smells right.” She was talking about the rise. She was also, we later realized, talking about life.
Not Sure What to Cook Today?
Open your fridge, pick a few ingredients… and turn them into a real recipe in seconds.
No guessing. No waste. Just simple, nostalgic meals.Recipe Quick Stats
Cinnamon Rolls: At-a-Glance
Ingredients You’ll Need
For the Soft Dough:
- 1 cup warm milk (110°F—feels warm but not hot on your wrist)
- 2 eggs, room temperature
- ⅓ cup butter, melted
- 4½ cups all-purpose flour
- 1 teaspoon salt
- ½ cup white sugar
- 2½ teaspoons active dry yeast
For the Sweet Filling:
- 1 cup brown sugar, packed
- 2½ tablespoons ground cinnamon
- ⅓ cup butter, softened
For the Cream Cheese Frosting:
- 3 ounces cream cheese, softened
- ¼ cup butter, softened
- 1½ cups confectioners’ sugar (powdered sugar)
- ½ teaspoon vanilla extract
- ⅛ teaspoon salt
How to Make Cinnamon Rolls Recipe
This simple cinnamon rolls for beginners guide breaks down every step clearly!
Making the Dough
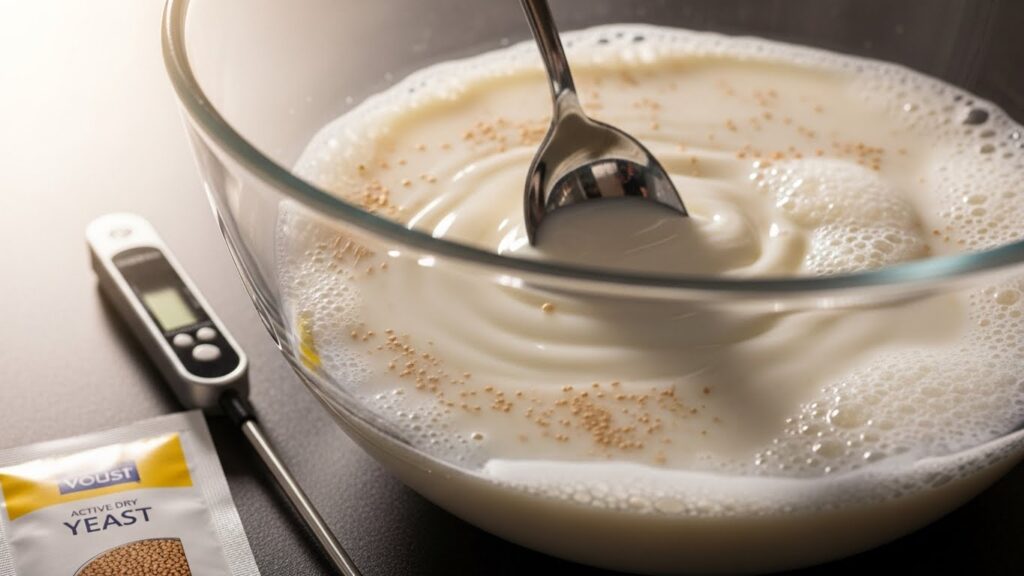
Step 1: Wake Up the Yeast
Pour the warm milk into a large bowl. Add the sugar and yeast, then stir gently. Let this mixture sit for 5-10 minutes until it gets foamy on top, like a bubble bath! This foam means the yeast is “waking up” and ready to make your dough rise. If it doesn’t foam, your milk might have been too hot (which kills yeast) or too cold (which won’t wake it up)—try again with fresh yeast and milk at the right temperature.
Step 2: Mix the Wet Ingredients
Add the eggs and melted butter to your foamy yeast mixture. Stir everything together with a wooden spoon. Then add the salt and 2 cups of the flour. Beat everything together until it’s smooth and well mixed. The mixture will look like thick pancake batter at this point.

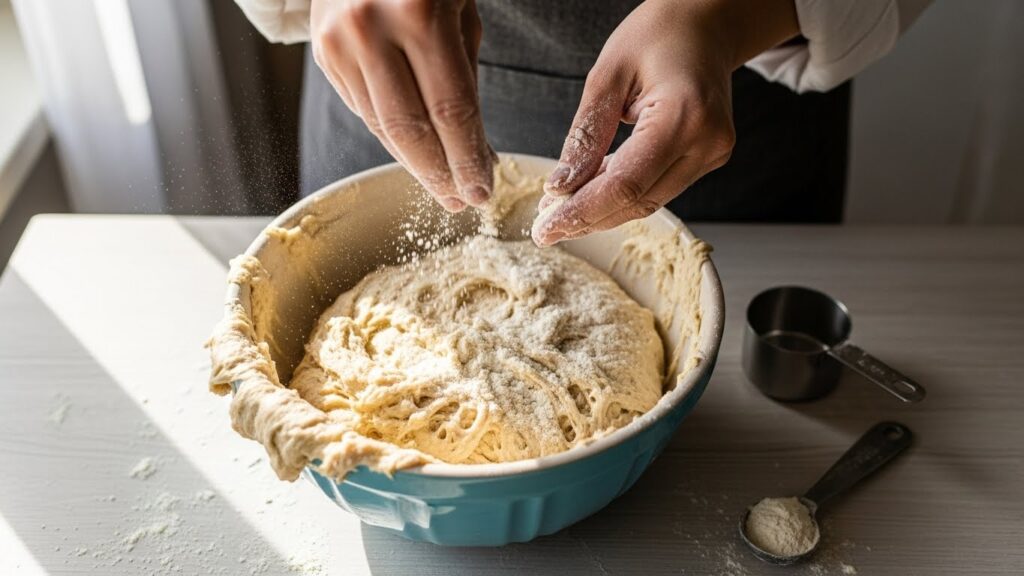
Step 3: Add More Flour
Now start adding the rest of the flour, about half a cup at a time. Stir after each addition. When the dough starts getting too thick to stir with a spoon, it’s time to use your hands! The dough should pull away from the sides of the bowl but still feel slightly sticky.
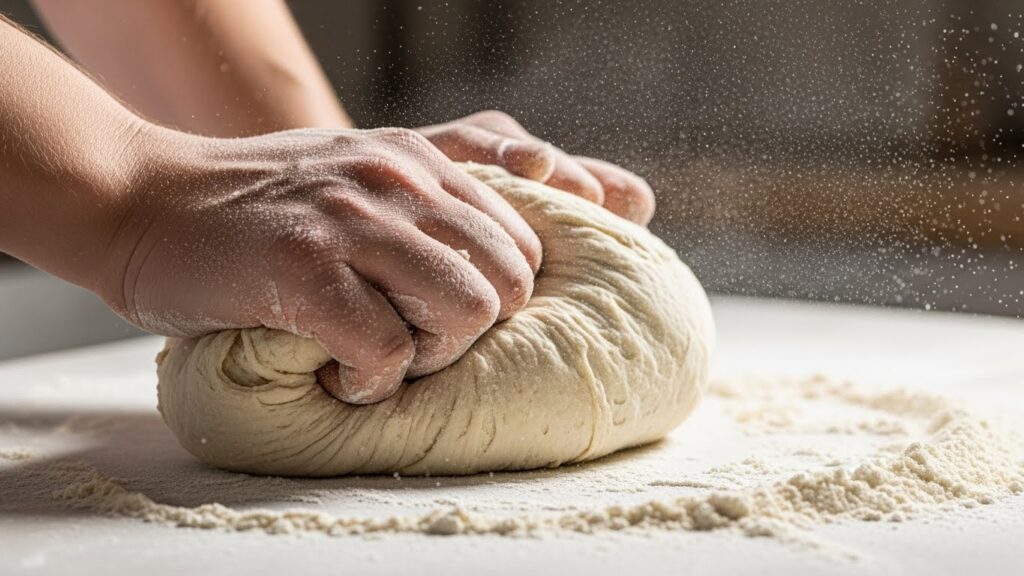
Step 4: Knead the Dough
Sprinkle some flour on your counter or a large cutting board. Put your dough on the floured surface and start kneading! To knead, push the dough away from you with the heels of your hands, fold it back over itself, turn it a quarter turn, and repeat. Keep doing this for 5-8 minutes. The dough will change from sticky and rough to smooth and elastic—like a soft, stretchy pillow! This kneading is what makes your rolls soft and fluffy.
Step 5: Let It Rise
Rub a little butter or oil inside a large bowl. Put your dough ball in the bowl and turn it over so all sides are lightly greased. Cover the bowl with a clean kitchen towel or plastic wrap. Put it somewhere warm (like on top of your refrigerator or in a sunny spot) and let it rest for about 1 hour. The dough should double in size—it will look like it’s been inflated like a balloon!
Creating the Cinnamon Filling
Step 6: Roll Out the Dough
After the dough has risen, punch it down gently with your fist (this is the fun part!). Put it on a floured counter and use a rolling pin to roll it into a big rectangle, about 16 inches by 21 inches. Try to keep the edges fairly straight and the thickness even—about ¼ inch thick all over.

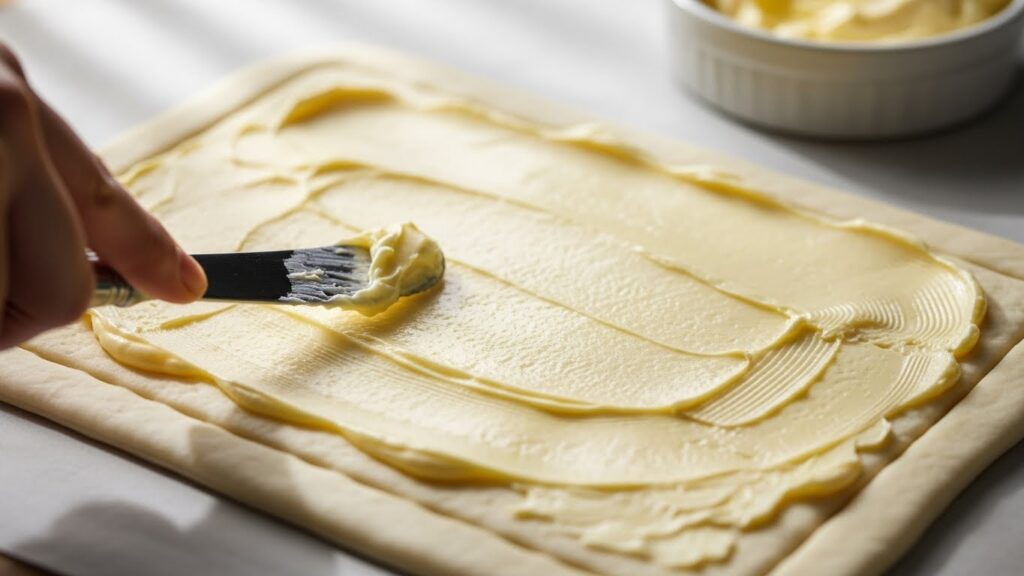
Step 7: Spread the Butter
Take your softened butter (it should be soft like room-temperature peanut butter, not melted) and spread it all over the dough rectangle using a butter knife or the back of a spoon. Leave about half an inch at the edges without butter.
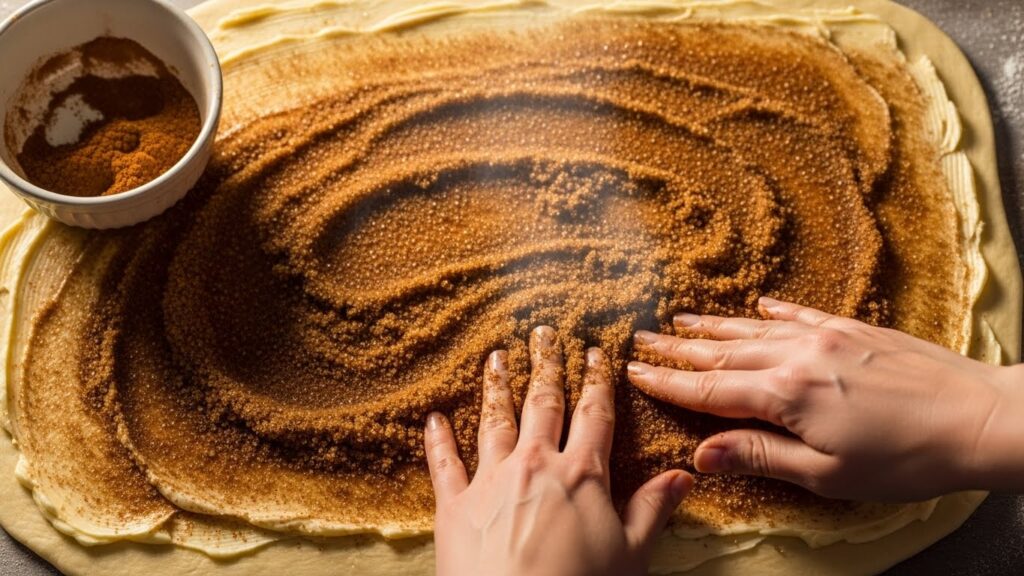
Step 8: Add the Cinnamon Sugar
In a small bowl, mix together the brown sugar and cinnamon until well combined. Sprinkle this mixture evenly over the buttered dough. Use your hands to spread it around so every part is covered. The cinnamon and sugar will smell amazing!
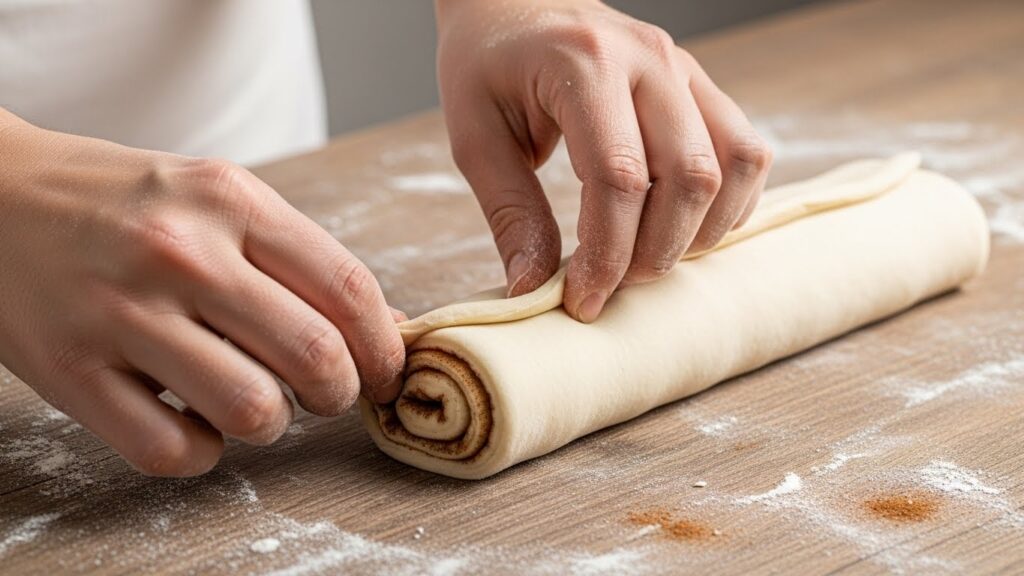
Step 9: Roll It Up
Starting from one of the long sides, carefully roll the dough up tightly like you’re rolling up a sleeping bag or a yoga mat. Keep the roll even and tight as you go. When you get to the end, pinch the edge into the roll to seal it.
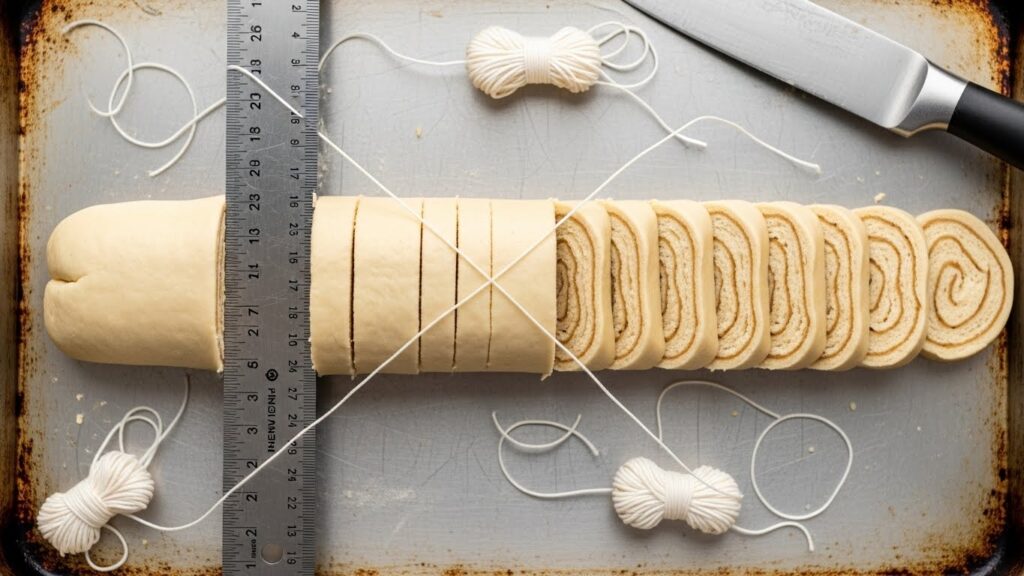
Step 10: Cut the Rolls
Using a sharp knife or dental floss (really!), cut the log into 12 equal pieces. If you use dental floss, slide it under the roll, bring the ends up and cross them, then pull—it cuts perfectly without squishing! Place the rolls cut-side up in a greased 9×13 inch baking pan. They should almost touch each other.
The Second Rise and Baking
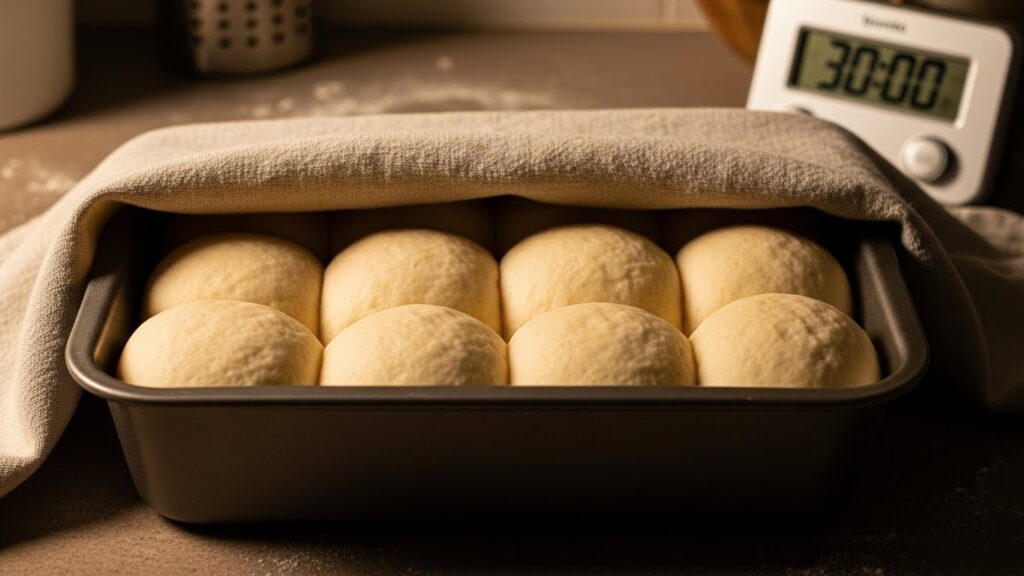
Step 11: Let Them Rise Again
Cover your pan of rolls with a towel and let them rise again for about 30 minutes. They should look puffy and nearly doubled. This second rise makes them extra soft and fluffy!
Step 12: Bake to Golden Perfection
While the rolls are rising, preheat your oven to 350°F. When the rolls are puffy and the oven is hot, put the pan in the oven and bake for 20-25 minutes. The rolls should be golden brown on top and smell incredible. Don’t overbake them or they’ll be dry instead of soft!

Making the Cream Cheese Frosting
Step 13: Mix the Frosting
While the rolls are baking, make your frosting. In a medium bowl, beat together the softened cream cheese and butter with a mixer or wooden spoon until smooth and creamy. Add the powdered sugar, vanilla, and salt. Beat until the frosting is fluffy and smooth with no lumps. If it seems too thick, add a tiny bit of milk.

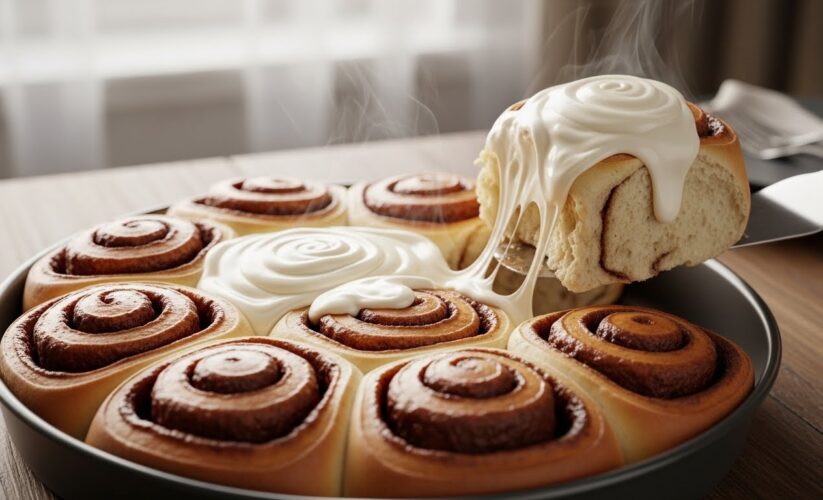
Step 14: Frost and Serve
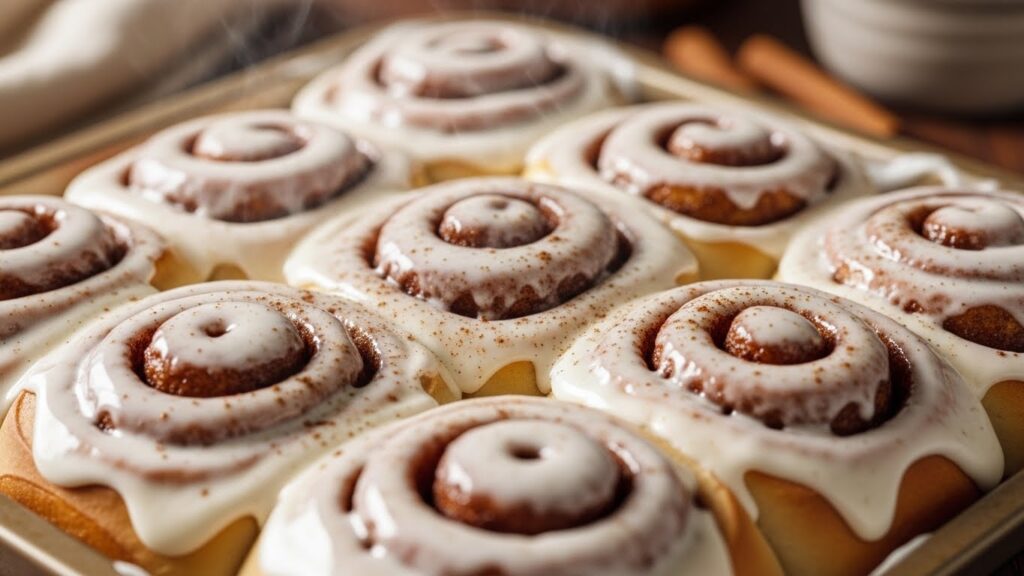
When the rolls come out of the oven, let them cool for just 2-3 minutes—you want to frost them while they’re still warm! Spread the frosting generously over all the rolls. The frosting will melt slightly into the warm rolls, making them even more delicious. These cinnamon rolls with cream cheese icing are now ready to enjoy!
Why “From Scratch” Is Not Just a Description — It’s the Whole Difference
There are canned cinnamon rolls. There are frozen cinnamon rolls. There are kits and mixes and shortcuts that produce something warm and sweet and entirely forgettable by noon.
Then there are grandma’s rolls.
The difference is not mystical. It is specific, and it comes down to three things: whole milk enriched dough, real butter at every layer, and a cream cheese frosting that isn’t thinned out with water.
Whole milk creates an enriched dough — a dough where fat and protein from the dairy tenderize the gluten network, making the final roll soft rather than chewy. Serious Eats confirms that whole milk (not skim, not plant milk) gives enriched doughs their characteristic tenderness because of the fat content, which coats gluten strands and prevents them from becoming tough.
Real butter — soft but not melted — spreads into every layer of the rolled dough and creates the distinct laminated swirls in the cross-section of each roll. Margarine doesn’t do this. Spreadable butter from a tub doesn’t do this. Cold block butter, brought to true room temperature, does.
Cream cheese frosting — not a glaze, not a drizzle, but a real, thick, tangy cream cheese frosting — is the finish that takes a good cinnamon roll and makes it unforgettable. The Kitchn explains that the acidity in cream cheese cuts through the sweetness of the roll and adds a savory undertone that vanilla glaze simply cannot replicate.
Not Sure What to Cook Today?
Open your fridge, pick a few ingredients… and turn them into a real recipe in seconds.
No guessing. No waste. Just simple, nostalgic meals.When the Dough Fights Back — Honest Troubleshooting
Rolls didn’t rise: Yeast was dead, milk was too hot (kills yeast above 120°F), or the kitchen was too cold. Always proof yeast separately first. Always check the temperature of your milk.
Rolls are dense and bready: Either the dough was over-kneaded, under-risen, or too much flour was added. Dough should be soft and tacky, not stiff. Add flour slowly — one tablespoon at a time — and stop as soon as the dough is manageable.
Filling leaked out during baking: Butter in the filling was too melted (it should be soft, not liquid), or the roll wasn’t sealed tightly enough at the seam. Chill the filled log for 10 minutes before slicing if the butter seems too soft.
Frosting too thin: Add powdered sugar, one tablespoon at a time. If cream cheese frosting breaks or looks greasy, both the cream cheese and butter were likely cold — they must be at true room temperature before beating. Joy of Baking covers cream cheese frosting troubleshooting in detail.
Rolls are dry after cooling: They were overbaked. Pull them at 185°F internal, not by color. Revive slightly dry rolls by covering with foil and warming in a 300°F oven for 8 minutes.
How Long They Keep — and Why They Rarely Need to
- Same day: Best in the first few hours, frosted and warm.
- Room temperature: Unfrosted rolls stay soft under a dome or wrapped for up to 2 days. Frosted rolls develop a skin at room temperature — refrigerate instead.
- Refrigerator: Covered tightly, up to 4 days. Warm individual rolls in the microwave for 20 to 30 seconds before eating. According to USDA food safety guidelines, cream cheese-based frostings should always be refrigerated.
- Freezer: Freeze unfrosted baked rolls wrapped individually in plastic, then together in a bag, for up to 3 months. Thaw at room temperature, warm in the oven, then frost fresh.
More From the Kitchen That Woke the Whole House Up
If recipes that ask something of you — a little time, a little patience, a little attention — are the ones you come back to, you’ll find your people here:
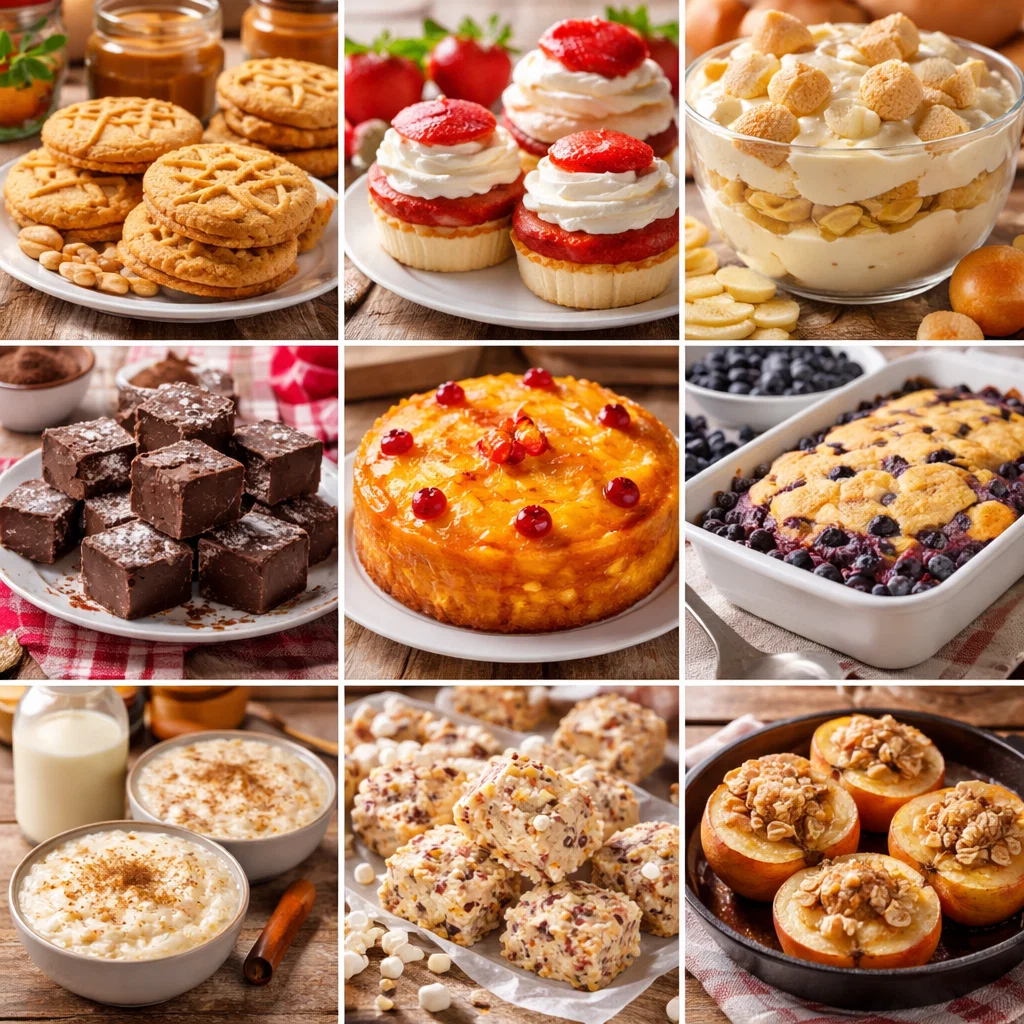
- 🍎 Grandma’s Old Fashioned Apple Pie Recipe From Scratch — the pie that ends every argument about dessert
- 🍠 Old Fashioned Homemade Sweet Potato Pie With Evaporated Milk — the Thanksgiving dessert that wins without announcing itself
- 🍫 Easy Moist Chocolate Mayonnaise Cake Recipe — the secret ingredient everyone suspects and nobody admits
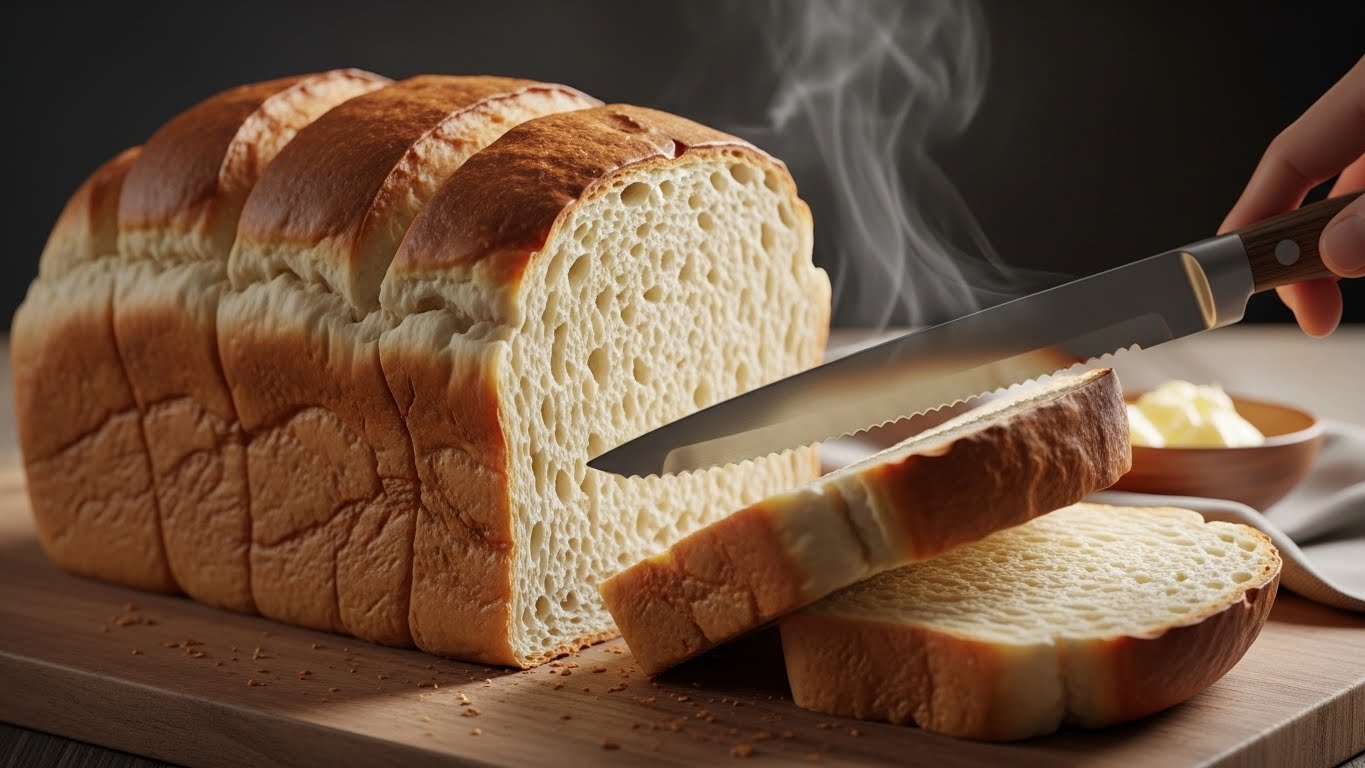
- 🍞 Classic White Bread Recipe — the loaf that belongs in every kitchen, made by every pair of hands
- 🥔 Cheesy Potato Casserole Recipe — the side dish nobody ever leaves behind
And if you’ve got a stocked pantry but no plan, our completely Free Recipe Maker from Ingredients will find you a recipe worth making. Type in what you have. Get back something real. No account, no paywall, no nonsense — just old-fashioned cooking made easy.
The Last Saturday Morning
The last time grandma made these rolls herself, she was eighty-one.
She moved more slowly than she used to, and she let me do the kneading while she directed. “Eight minutes. Keep going.” She sat at the kitchen table and watched me work, occasionally saying things like “more flour” or “not yet” or just “good” — that single syllable that carried more weight than any sentence.
When the rolls came out of the oven, she stood up, walked to the counter, and spread the cream cheese frosting herself. Her hands still knew exactly how thick to go. Thick over the center rolls, thinner toward the edges, always a little extra in the swirls where it could pool.
We ate them at the table that morning, the two of us, with coffee. She didn’t say much. Neither did I. The rolls were the conversation.
That’s what Grandma’s soft homemade cinnamon rolls recipe from scratch with cream cheese frosting is, at its heart. Not just a recipe. Not just flour and butter and yeast and time. It’s a reason to wake up early on a Saturday. It’s a reason to cover a bowl with a dish towel and walk away and trust the process. It’s the smell that finds you in the hallway before you’re fully awake and pulls you, gently but completely, into the kitchen.
Make them this weekend. Wake up before everyone else.
Let the house smell like something.
Published on NostalgicEats.com | Classic American Comfort Recipes Explore more at: nostalgiceats.com
Not Sure What to Cook Today?
Open your fridge, pick a few ingredients… and turn them into a real recipe in seconds.
No guessing. No waste. Just simple, nostalgic meals.