
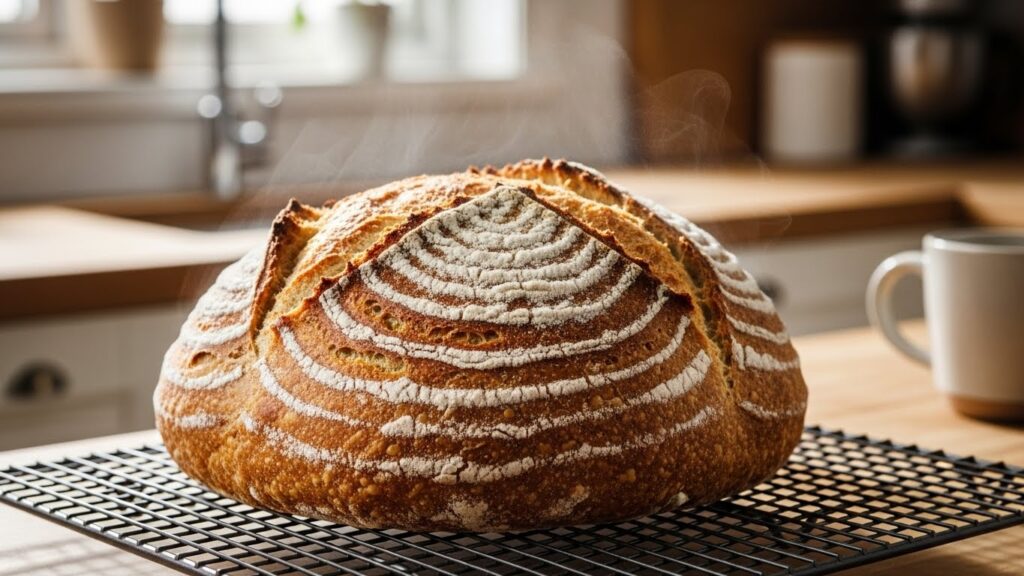
Sourdough Bread Recipe – Homemade Classic Artisan Loaf
Old Fashioned Homemade Sourdough Bread Recipe From Scratch No Dutch Oven — Before There Were Special Tools, There Was Just Bread
Grandma did not own a Dutch oven.
She did not own a banneton proofing basket. She did not own a bread lame or a bench scraper or a digital kitchen scale. She did not have a sourdough Facebook group, a fermentation thermometer, or a notebook full of hydration percentages. She did not use the words “autolyse” or “bulk ferment” or “open crumb structure.”
She had a clay crock of starter on the back of the counter that she’d been feeding since before any of us were born. She had a big ceramic bowl, a loaf pan, and an oven that ran about fifteen degrees hot. She had patience — the particular kind that comes from knowing something by hand rather than by instruction — and she had flour, water, and salt.
What she made with those things was the best bread most of us ever ate.
This old fashioned homemade sourdough bread recipe from scratch no Dutch oven is the one she made. Not the complicated version the internet turned sourdough into. The original version — older than food blogs, older than stand mixers, older than the very idea that bread required special equipment to be worth making.
Welcome to Nostalgic Eats, where the recipes that have been around the longest are usually the ones worth trusting most.
Not Sure What to Cook Today?
Open your fridge, pick a few ingredients… and turn them into a real recipe in seconds.
No guessing. No waste. Just simple, nostalgic meals.The Crock on the Back Counter That Never Once Got Washed Out
It sat in the same spot for forty years. A wide-mouthed clay crock, the color of old cream, with a loose-fitting lid that let just enough air in and just enough smell out. The smell was not entirely pleasant up close — sour and yeasty and alive in a way that synthetic things never are. But mixed into fresh bread, that smell became something else entirely.
Grandma fed her starter every few days when she was baking regularly — a scoop out, a scoop of flour, enough water to bring it back to the consistency of thick pancake batter. She never weighed anything. She never took its temperature. She just looked at it, stirred it once, and knew whether it was ready.
That starter, and the bread it made, were the product of a living relationship between a woman and her yeast that spanned more years than most marriages.
The modern sourdough revival — which exploded during the pandemic years and produced more hydration charts than any hobby in culinary history — has given the world wonderful bread. It has also, accidentally, convinced a generation of new bakers that sourdough is complicated. That it requires specific vessels and tools and precise temperatures and a vocabulary that sounds more like engineering than cooking.
King Arthur Baking acknowledges this directly: sourdough is one of the oldest forms of leavened bread in human history, made for thousands of years before Dutch ovens, proofing baskets, or scoring lames existed. The fundamentals — a live fermented starter, flour, water, salt, and time — have not changed. Everything else is refinement, not requirement.
Grandma’s crock on the back counter was just proof that the fundamentals were always enough.
💡 Her Rule: “If it bubbles when you stir it, it’s ready. If it smells like it means something, it’s ready. If it looks alive — use it.” She was describing starter activity in three sentences that no hydration chart has ever improved on.
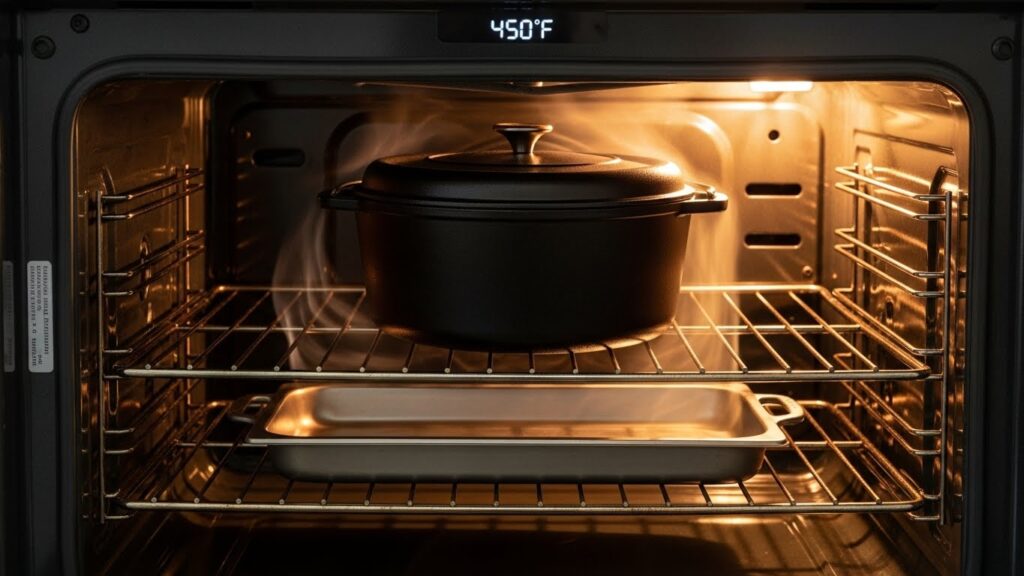
Why No Dutch Oven Is Not a Compromise — It’s the Original Method
The Dutch oven became the dominant sourdough baking vessel because it solves a specific problem: steam.
A sourdough loaf needs steam in the oven during the first 20 minutes of baking. Steam keeps the crust soft long enough for the bread to fully expand before the crust sets and hardens. Without steam, the crust forms too early, the bread can’t expand, and you end up with a dense loaf that split awkwardly along the bottom where steam forced its way out regardless.
A Dutch oven with the lid on traps the bread’s own steam perfectly, solving the problem automatically. This is why every modern sourdough recipe recommends one.
But here’s what those recipes don’t say: professional bakeries solved this problem long before Dutch ovens were part of the home baker’s vocabulary. They used steam injectors. Home bakers before them used a pan of boiling water on the oven floor. Grandma used a deep roasting pan placed upside-down over her loaf for the first twenty minutes — a dome of steam created from nothing but a pan she already had.
Serious Eats confirms what experienced bakers have always known: any enclosed steam environment produces the same result as a Dutch oven. The vessel doesn’t matter. The steam does. And steam can be created with any heavy pot, any deep roasting pan, even a large stainless bowl turned upside down over the loaf.
The Dutch oven is a convenience. It is not a requirement. It never was.
💡 The No-Dutch-Oven Steam Method: Place a large, deep roasting pan on the oven floor before preheating. When you load the bread, pour one cup of boiling water into the roasting pan and close the oven door immediately. The rush of steam it creates gives you exactly what a Dutch oven lid provides — at zero additional cost.
Building the Starter — The Living Thing That Makes This Bread Possible
Before the bread, the starter. Everything else in this recipe depends on a starter that is active, bubbly, and genuinely alive. If the starter is sluggish or underfed, the bread will not rise properly regardless of how careful you are with everything else.
If you already have an active sourdough starter, skip to the next section. If you’re beginning from scratch, here is the honest version of how to build one — not the complicated version, the grandma version.
Building a starter from scratch (7 to 14 days):
Day 1: In a clean jar, combine 50 grams of whole wheat flour (or unbleached all-purpose) and 50 grams of room-temperature filtered water. Stir vigorously until no dry flour remains. Cover loosely with a cloth or lid left slightly ajar. Leave at room temperature — ideally between 70 and 75°F.
Days 2 through 5: Once daily, discard all but 50 grams of the starter, then add 50 grams of fresh flour and 50 grams of water. Stir, cover, leave. The first few days may show little activity. This is normal. By day 3 or 4, small bubbles should begin appearing on the surface and sides of the jar. The smell will progress from plain flour to something faintly sour and yeasty.
Days 6 through 10: The starter should be visibly bubbling and rising after each feeding — doubling in size within 4 to 8 hours and then falling back down. This rise-and-fall cycle is the starter working. The smell should be pleasantly sour, like yogurt or mild vinegar, not unpleasant.
Ready test: Drop a teaspoon of starter into a glass of room-temperature water. If it floats, it is ready to bake. If it sinks, feed it once more and test again in 6 to 8 hours.
The Kitchn walks through this process with detailed photos for each day — useful for first-time starter builders who want visual confirmation at each stage. Farmhouse on Boone also covers common starter troubleshooting in accessible, non-technical language.
📌 On filtered water: Chlorine in tap water can inhibit yeast activity. If your city water is heavily chlorinated, use filtered water or let tap water sit uncovered overnight — the chlorine dissipates. Grandma had well water, which had none of these concerns. The rest of us adapt.
Not Sure What to Cook Today?
Open your fridge, pick a few ingredients… and turn them into a real recipe in seconds.
No guessing. No waste. Just simple, nostalgic meals.Sourdough Bread: Quick Reference
Ingredients You’ll Need
Basic Ingredients:
- 1 cup active sourdough starter (fed and bubbly)
- 1 1/2 cups warm water (around 75-80°F)
- 5-6 cups all-purpose flour
- 2 1/2 teaspoons salt
- 1 tablespoon sugar
Optional Equipment & Additions:
- Dutch oven or covered baking vessel
- Parchment paper
- Cornmeal for dusting
- Shallow pan for steam
- Sharp knife or bread scoring blade
How to Make Sourdough Bread
Step 1: Create the Initial Mixture
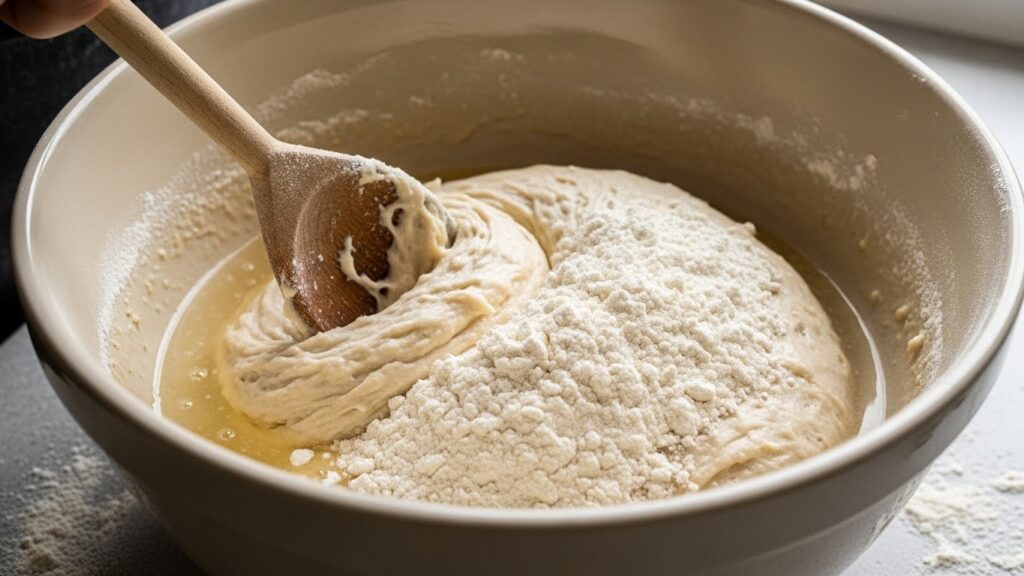
In a large mixing bowl, combine 1 cup active sourdough starter with 1 1/2 cups warm water. The water temperature matters—aim for around 75-80°F, warm to the touch but not hot. Stir these together until well combined. Add 3 cups all-purpose flour and mix thoroughly until no dry flour remains. This mixture, called the autolyse, begins the fermentation process immediately.
Step 2: Initial Fermentation
Cover the bowl with a damp cloth or plastic wrap and let sit at room temperature for 2 to 4 hours. During this time, the flour hydrates, gluten develops naturally, and the yeast and bacteria begin fermenting. You should see the mixture become increasingly bubbly and rise noticeably. Warmer kitchens may ferment faster—check periodically and proceed when the mixture is noticeably bubbly and risen.
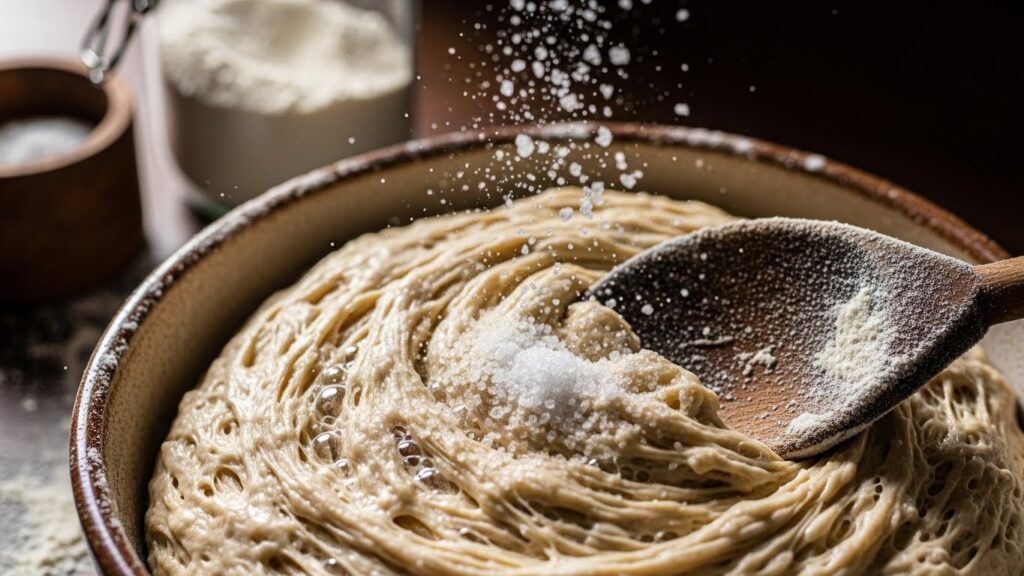
Step 3: Add Salt and Remaining Flour
After the initial fermentation, add 2 1/2 teaspoons salt and 1 tablespoon sugar. These seem like small additions but serve important purposes—salt strengthens gluten development and adds flavor, while sugar provides additional food for the yeast. Add the remaining 2-3 cups flour gradually, mixing until you have a shaggy dough that’s stiff but still workable.
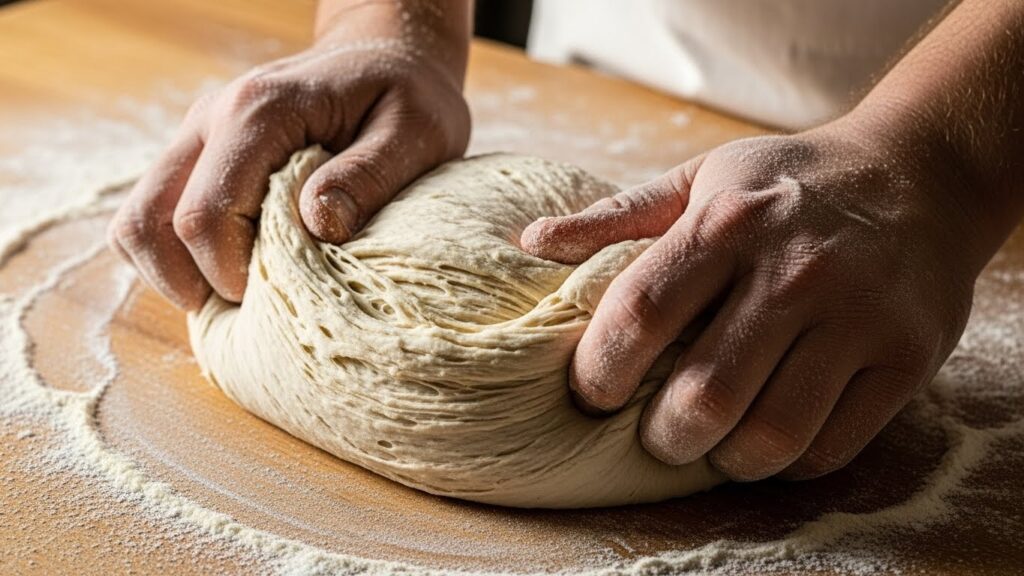
Step 4: Knead the Dough
Turn the dough onto a lightly floured surface and knead for 10 to 15 minutes. The dough will gradually become smoother and more elastic as gluten develops. You’ll notice the transformation from rough, shaggy texture to smooth, cohesive dough. If the dough seems too wet and sticky, add flour gradually—a teaspoon at a time. If it seems dry and crumbly, add water a tablespoon at a time. Good sourdough dough feels slightly tacky but holds together.
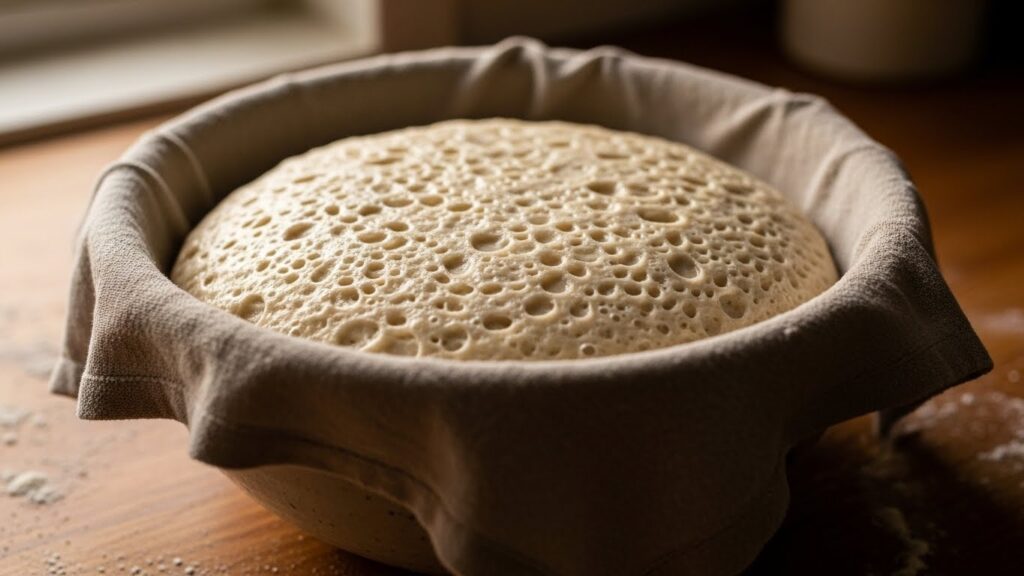
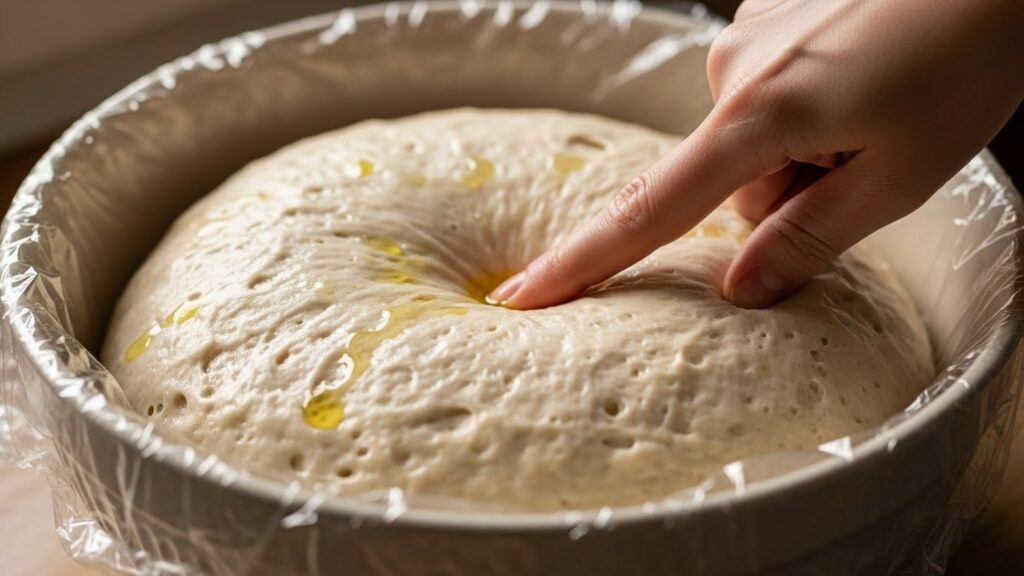
Step 5: First Rise
Place the kneaded dough in a lightly greased bowl and cover with a damp cloth or plastic wrap. Let rise at room temperature until roughly doubled in size, approximately 1 to 2 hours depending on kitchen temperature. A good test is the poke test—gently poke the dough with a floured finger. If the indentation springs back slowly, the dough is ready. If it springs back quickly, it needs more time. If it doesn’t spring back, it may be overproofed.
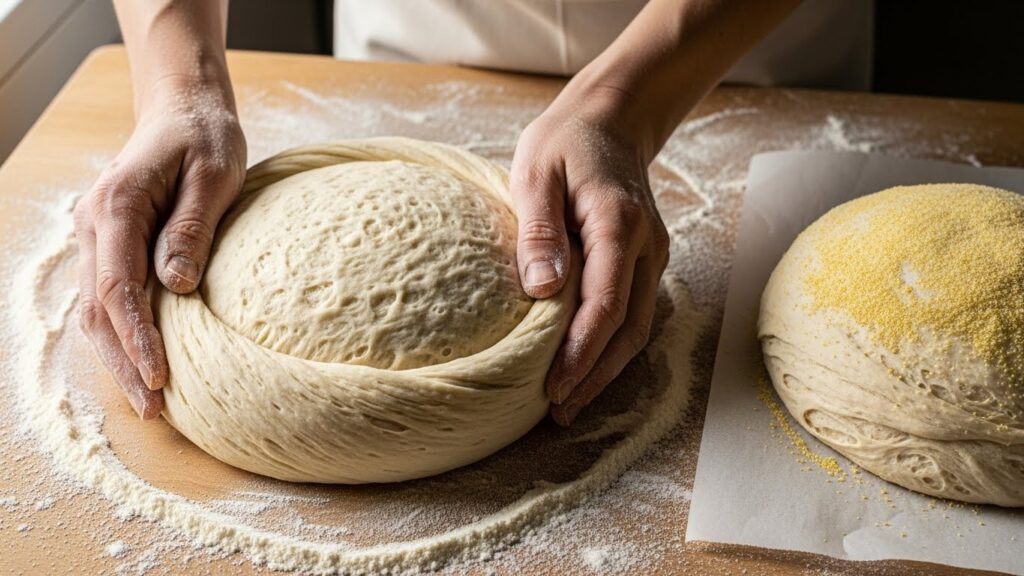
Step 6: Shape the Loaf
Punch down the risen dough gently to release excess gas. Turn onto a lightly floured surface and shape into a round or oval loaf. Create tension by gently pulling the dough toward you, rotating slightly as you work. This creates surface tension that helps the loaf rise upward rather than spreading outward. Place the shaped loaf on a parchment-lined baking sheet that’s been dusted with cornmeal.
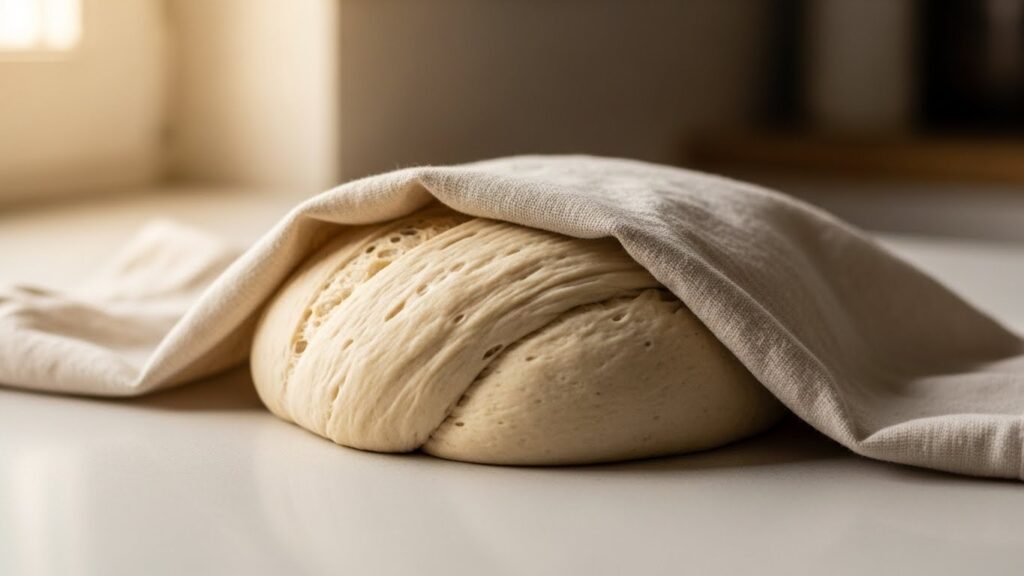
Step 7: Final Rise
Cover the shaped loaf with a damp cloth or plastic wrap and let rise at room temperature until nearly doubled in size, about 1 hour. Again, use the poke test to gauge readiness. The dough should rise noticeably but not completely double—you want it puffy but still responsive.
Step 8: Prepare for Baking
About 30 minutes before baking, preheat your oven to 450°F. Place a shallow pan on the bottom oven rack—this will hold water to create steam, which creates the beautiful crust. If using a Dutch oven, preheat it as well. The hot Dutch oven traps steam around the bread, creating an exceptional crust.
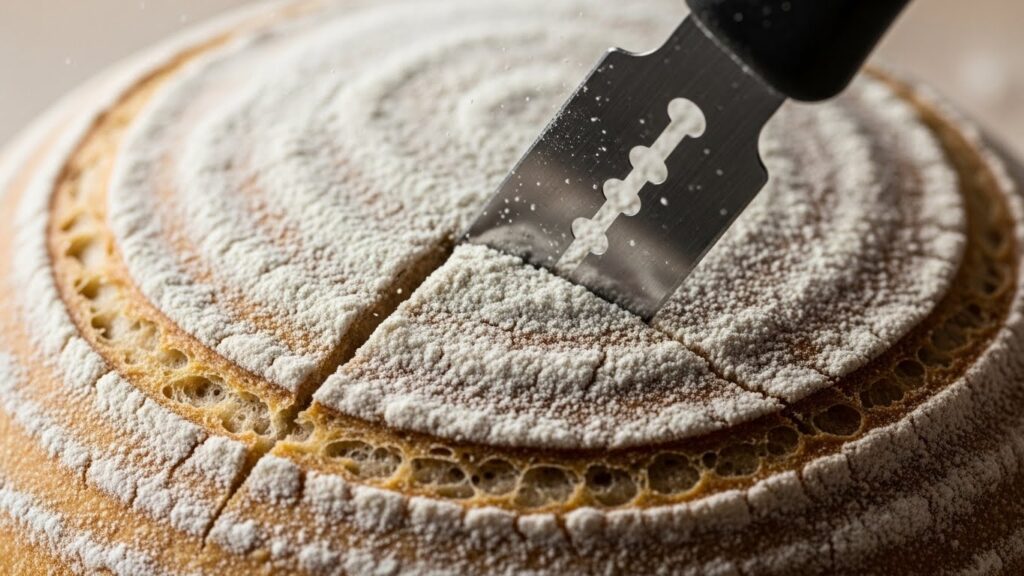
Step 9: Score the Loaf
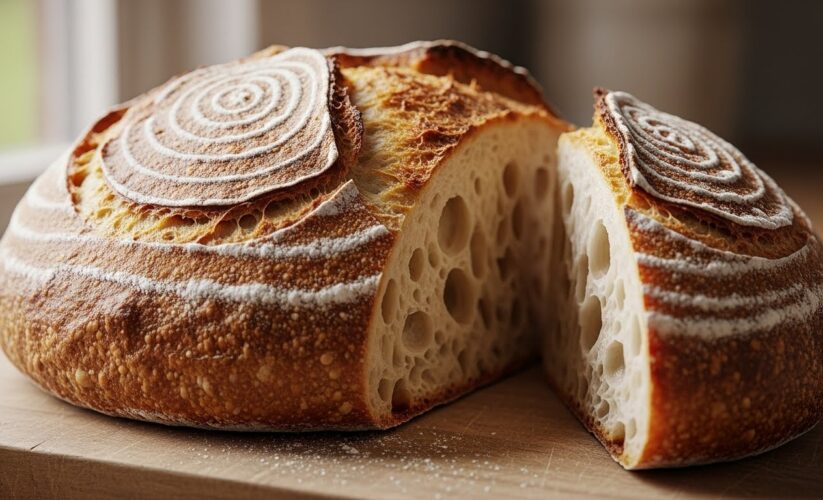
Using a sharp knife or bread scoring blade, make a 1/4-inch deep slash across the top of the loaf. A single decisive slash works beautifully and is the classic approach. You can also make decorative crosshatch patterns if desired. The score controls where the bread expands, creating an attractive ear along the slash.
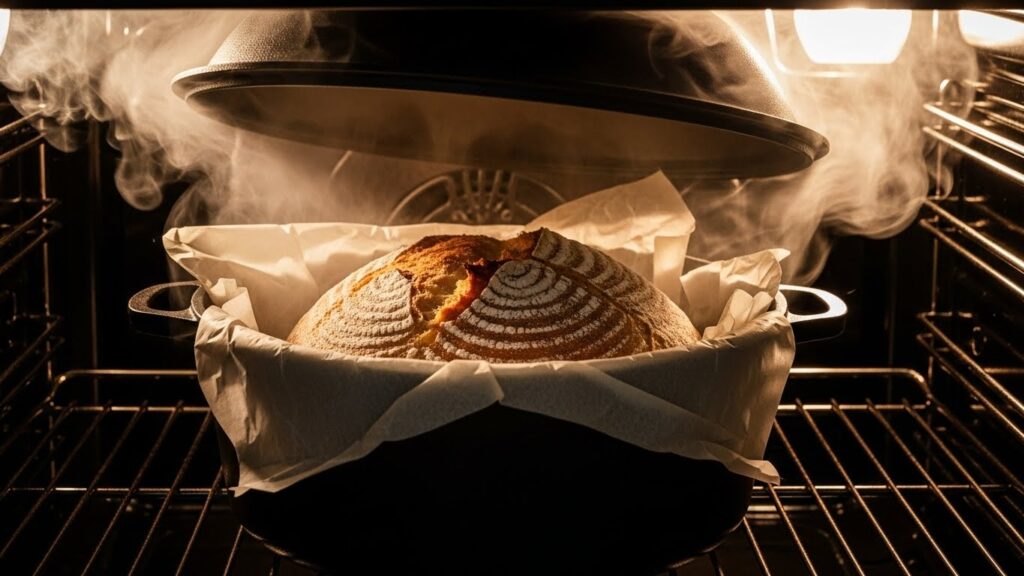
Step 10: Bake with Steam
Carefully place the bread in the preheated oven. If using a Dutch oven, place the loaf on parchment inside, then cover with the hot lid. If baking on a sheet, immediately pour 1 cup of hot water into the shallow pan on the bottom rack. Close the door quickly to trap steam.
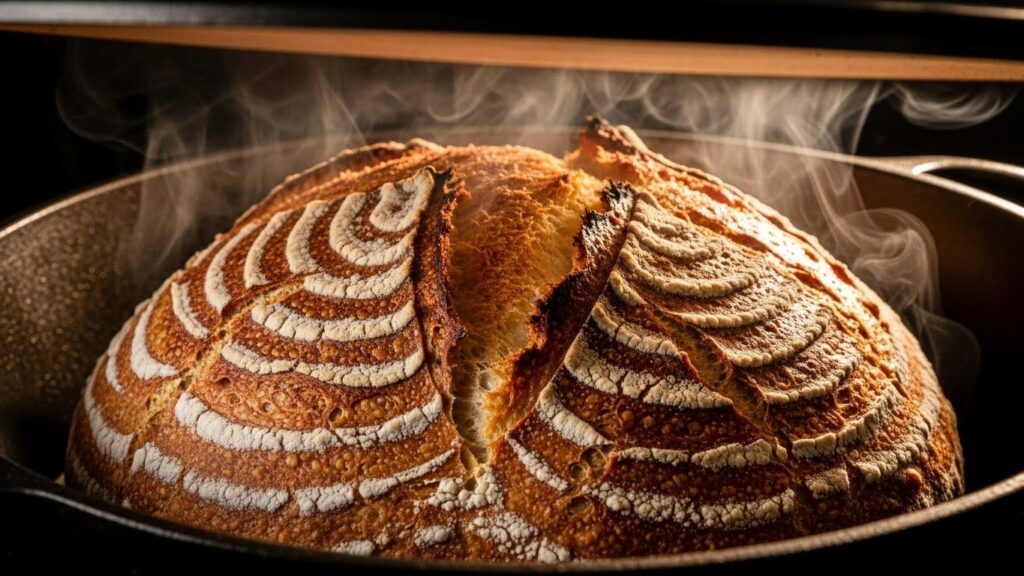
Step 11: Monitor Baking
Bake for 25 to 30 minutes until the loaf is deep golden brown and sounds hollow when tapped on the bottom. The crust should be crispy and firm. Remove the Dutch oven lid (if using) about halfway through to allow the crust to develop color. The internal temperature should reach 205-210°F when measured with an instant-read thermometer inserted into the center.
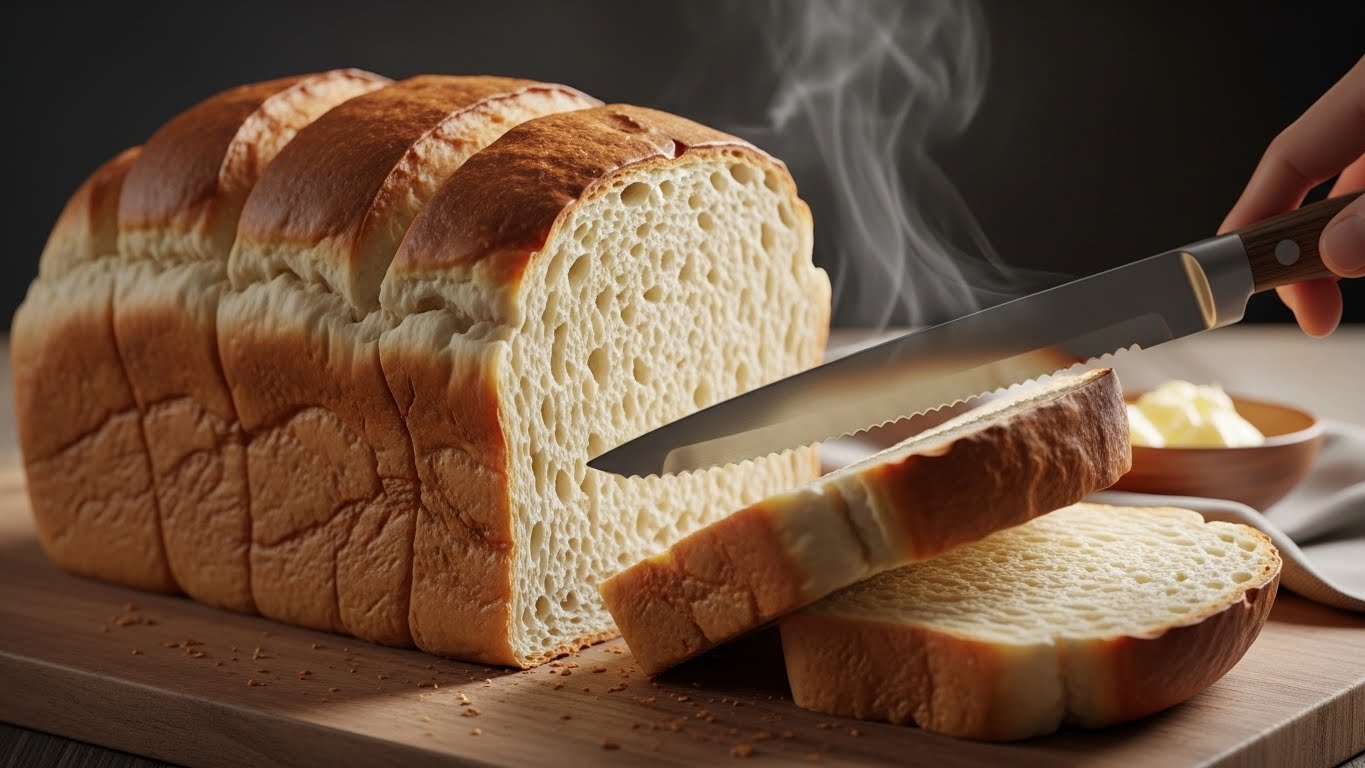
Step 12: Cool Completely
Remove from the oven and transfer to a wire cooling rack. This is crucial—the bread continues cooking internally as it cools, and steam escapes. Resist the urge to slice immediately. Wait at least 30 minutes, ideally 1-2 hours, before cutting. Cutting too early results in gummy interior as steam hasn’t fully escaped.
When the Bread Doesn’t Rise — The Honest Answers
Flat, dense loaf with no oven spring: The starter wasn’t active enough. Feed it, wait for it to double and pass the float test before using. This is the cause of most failed sourdough loaves.
Gummy interior, even after cooling: Underbaked or cut too soon. Internal temperature must reach 205°F minimum. Cool the full two hours.
Very sour, almost vinegary taste: Dough over-fermented during bulk or cold proof. Reduce bulk fermentation time or shorten the cold proof. The acetic acid that produces sharp sourness is produced most abundantly during long, slow, cold fermentation.
Crust is pale and thick but not crunchy: Not enough steam in the oven, or oven not hot enough. Pour the boiling water directly into the preheated pan immediately after loading the bread. Don’t delay.
Bread spread sideways instead of rising up: Dough is too slack (too much water or too little gluten development), or it wasn’t shaped with enough tension. Reduce water by 10 grams next time, and focus on building tighter surface tension during shaping. AllRecipes’ sourdough troubleshooting guide covers every variation of this problem with specific adjustments.
Not Sure What to Cook Today?
Open your fridge, pick a few ingredients… and turn them into a real recipe in seconds.
No guessing. No waste. Just simple, nostalgic meals.Keeping the Bread — and the Starter
The bread:
- Room temperature: Cut-side down on a cutting board, wrapped loosely in a cloth, for up to 3 days. Sourdough naturally resists mold better than commercial bread due to its acidity. USDA food safety guidelines confirm that the lactic acid in sourdough acts as a natural preservative.
- Freezer: Slice completely, freeze in a bag for up to 3 months. Toast from frozen. Do not refrigerate — refrigeration accelerates staling in bread.
The starter:
- Feed once a week if stored in the refrigerator and baking infrequently. Remove from the refrigerator 12 hours before baking and feed once to reactivate. Grandma’s starter, fed from the same crock for forty years, is proof that this culture — properly maintained — is essentially immortal.
The Rest of the Table This Bread Has Always Belonged On
Sourdough bread has been the bread of working kitchens and simple tables for thousands of years. Here is what it belongs next to at ours:
- 🍗 Grandma’s Easy Crispy Fried Chicken Without Buttermilk — thick sliced sourdough for the sandwich the next morning
- 🥐 Grandma’s Old Fashioned Fluffy Drop Biscuits No Kneading No Rolling — two breads, two philosophies, both right
- 🍖 Meatloaf with Brown Sugar Glaze — there is no better bread for soaking up meatloaf pan drippings
- 🥔 Cheesy Potato Casserole Recipe — the side dish that makes a simple bread dinner into a meal
- 🌽 Cornbread and Buttermilk Sandwich — the Southern counterpart to this Northern/European tradition
And when your pantry is full but inspiration has gone quiet, our completely Free Recipe Maker from Ingredients will find you something worth making. Enter what you have. Get back something real. No account, no paywall — just honest old-fashioned cooking made simple.
The Crock Is Still There
After grandma passed, nobody moved the crock for a long time. It sat on the back counter exactly where it had always been, the loose-fitting lid in its same slightly crooked position, the dried film of old starter still marking the interior walls above the waterline.
Eventually someone thought to ask: had the starter survived?
It had. A little dried out, a little slower than it once was, but still there — still alive in the particular quiet way that wild yeast survives neglect and cold and the long spaces between feedings. We fed it. Within two days it was bubbling again. Within four it was doubling after each feeding, climbing the sides of the jar the way it always had, ready.
We made bread.
It tasted like it always had. That sour, complex, deeply wheaty flavor that commercial yeast has never once produced. The crust that shattered when you pressed it and gave way to a soft, airy crumb that smelled like something baked by someone who had been doing it a very long time.
This old fashioned homemade sourdough bread recipe from scratch no Dutch oven is that bread — made without special equipment, without complicated vocabulary, without anything that wasn’t available in any kitchen in any decade of the last hundred years.
A crock of starter. Flour, water, salt. Patience. A loaf pan and a roasting pan and an oven.
That’s all she ever used. That’s all you need.
Start the starter tonight if you don’t have one. Feed it for a week. Watch it wake up.
Then make the bread.
Published on NostalgicEats.com | Classic American Comfort Recipes Explore more at: nostalgiceats.com
Not Sure What to Cook Today?
Open your fridge, pick a few ingredients… and turn them into a real recipe in seconds.
No guessing. No waste. Just simple, nostalgic meals.


1 Comment
[…] you’re preserving peak-season peaches to enjoy year-round, spreading them on a thick slice of sourdough bread, or creating homemade gifts that actually impress people or simply wanting to taste the difference […]